April 25, 2012

Elizabethan Era


The image above is of Little Moreton Hall from Wikipedia. This building is one of many Elizabethan structures that inspire me.

I have changed direction once again on the birdhouse I am making for my brother.  There are a lot of half timbered buildings from the late 1500s and early 1600s that I find to be inspiring including the Stokesay Castle Gatehouse, one of my all time favorite buildings. Old hand drawn illustration of it below
Wikipedia Image common license


But I don't want to try and replicate an existing building as much as I love the Stokesay Castle Gatehouse. I prefer to design my pieces "in the style of" an era rather than creating a scale model. For one thing I don't have direct access to old buildings here in Seattle unless I count the authentic Tudor Manor house that is near Tacoma, WA. It was taken apart and shipped to the USA then reassembled brick by brick. So this morning I got busy in my CAD program and began designing an Elizabethan Gatehouse to build in 1:12 scale. The basic size and shape of the building is now finished but not much in the way of fine details. That is how I work, first the massing study for overall impact and balance then later I start embellishing the surfaces with all the details.

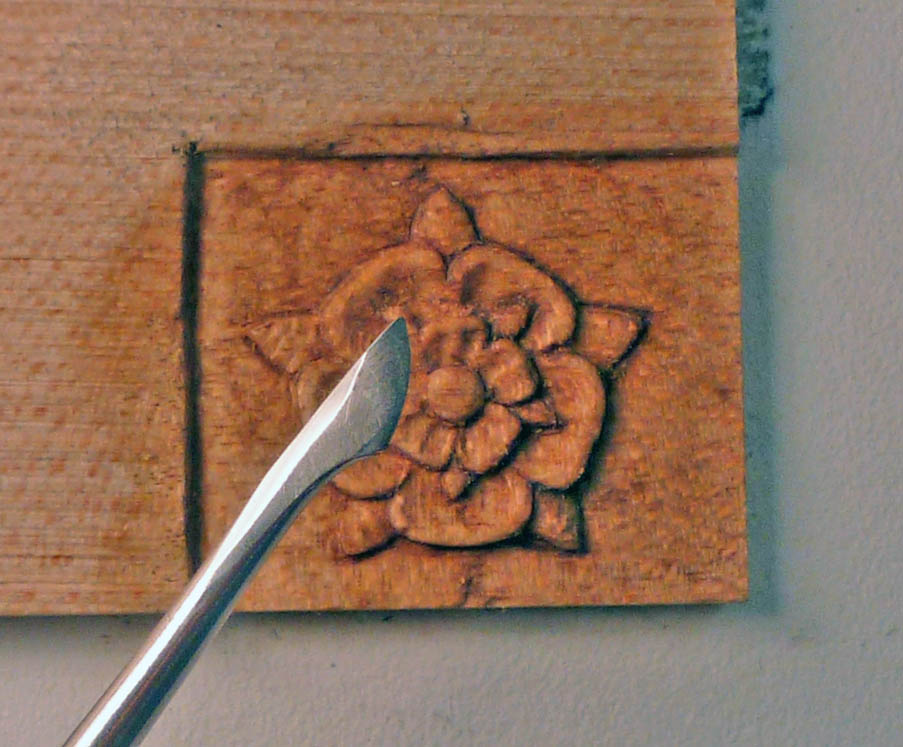
No interior needs to be done as it is not a dollhouse. I will be putting my recently upgraded carving skills to good use on it! Tonight I will start cutting walls, first in cardboard, then the marine plywood I use for birdhouse substrates. I can't make any mistakes or redo the plywood pieces, too expensive and hard to come by that material in recent years. That is one reason I no longer make many birdhouses. Local shipbuilders have been on an almost year long waiting list for their materials.

My recent list of films to watch have included Shakespeare in Love, Anonymous and Elizabeth. A little bit of synthetic time travel, amusing as well if not completely authentic in details.

Elizabethan birdhouse 

April 19, 2012

dragon of the day

photo copyright Karin Corbin 2012
Today's practice carving, 2.5" wide from pear wood. I am on a dragon kick this week, a few more to go before I move on to other objects. This dragon design is based on the classic S scroll style with some foliate details. His head is one end of the S, the tail the other. If you look at the dragon from the other day you will see it is also based on an S scroll layout as are quite a few carved panels. http://karincorbin.blogspot.com/2012/04/there-be-dragons.html

I am using up some pieces of pear wood from the end of the slab where there are cracks from the wood drying. It makes good practice wood, the pieces are not too small, not too large.

The antiquing is done using a couple of colors of stain. The first coat is lighter in tone and the second coat is some old thick, dark walnut stain. Lighter stain first keeps the piece from absorbing too much of the dark. Rub it on, wipe some off, wipe more on, hit it with a heat gun, wipe more off and on, etc. It is a random kind of process, not carefully controlled or thought out but it is still effective.

April 17, 2012

There be dragons

photo copyright Karin Corbin 2012
Today's carving practice piece made with pear wood. Width is 2.5 inches.

April 12, 2012

make a stropping wheel

photo copyright Karin Corbin 2012
Over the last couple of days I built a homemade stropping wheel for sharpening my carving tools. It makes them incredibly sharp, even the very tiny 1mm and .5mm gouges can be sharpened to a razor sharp edge with this wheel. There is no risk of overheating or burning the small tools. It will remove any minor nicks as well. A local carving teacher told me how to make this wheel.

The cost is low and the materials are easy to come by. The material the wheel is made from is mat board. Yes, it is the mat board you find at art supply stores and framing shops. You adhere layers of it together with a PVA glue such as Elmers. Be sure you cut accurate circles so you don't have to spend a lot of time shaping it into a true circular surface after you mount it to a motor. I did the final shaping of my wheel with a coarse grit sanding block while the motor was spinning the wheel. The sanding to a true circle creates a lot of fine dust so I used a vacuum cleaner nozzle right next to my sanding area to collect the dust. Don't forget to wear a dust mask! After the wheel is trued you can put honing compound on it.

I used 8 layers of double thick mat board in this wheel. I put weights on the stack of mat board disk while the glue set to prevent voids in the layers. Getting voids is a defect that will spoil the effectiveness of the wheel.

I have glued my new stropping wheel onto a plywood disk screwed to a faceplate so I could spin it with my lathe. It is very important to look at the photo above to see how the wheel should be turning in relationship to the tools you are sharpening. I am standing on the backside of my lathe while I am sharpening my carving tools to get the correct spin direction.

What a difference using this wheel is making in my work. I can't get my carving tools this sharp with hand stropping on leather. The tools now glide through the cuts with little effort or pressure leaving a nicely polished surface. I hear that lovely ssssstt noise as the tools cut. The noise that only happens when you have razor sharp cutting edges with polished bevels.

transfering images

photo copyright Karin Corbin 2012
Using carbon paper to transfer images to wood is a common method. However the layers of paper and carbon tend to shift and when working with miniatures it is even more difficult to control.

Thin pencil leads break or else the lines keep getting wider as the pencil wears down. Also the paper the image is printed on can tear when drawing on it if you press firmly.
photo copyright Karin Corbin 2012

So now I cut a small piece of carbon paper, cut the image to size and use clear cello packaging tape to hold those two items together covering complete over the paper leaving the tape wide enough to stick the image to the surface I am working on.

Instead of a pencil I use a metal scribe held at a slight angle so the point glides along on the surface of the packaging tape. Packaging tape is pretty tough stuff but it does remove without any trouble from the surface of the wood.

The end result is very nice image transfers with good dark lines and it is quickly done because there is no shifting or fussing.

April 11, 2012

practice, practice, practice

photo copyright Karin Corbin 2012


This pattern is really hard to cut because of all the curves, it frustrates me to do them because I can't get the big curves as even as I would like them to be. My hands are simply not yet fully trained for carving movements but day by day I am gaining on it.

This piece was from a piece of the free walnut wood I got the other week, nice and dark and the grain is OK, it carves nicely too. I think I will start making some trinket boxes out of the better practice pieces. One of these days I will have something good enough to use for furniture in my miniature cottage project. I need one or two chest, a table, dish cupboard, chairs, a bed, etc.

I have had to make a few more carving chisels, wish I had some more smaller gouges too. I had to switch out to my larger magnifying lamp and even the short pear handled gouges hit the lens. Always something to frustrate me while making miniatures...

April 4, 2012

tudor rose

photo copyright Karin Corbin 2012
I am not yet close to being good enough at carving to satisfy my personal standards anytime soon but I am getting better at small scale carving. This rose is .75 inches side to side, I want to be able to make it perfect at half that size by the end of the month. I did not get in very many hours of practice in the last week so I was pleased to see any improvement when I made this carving last night. Spending time watching video carving lessons has helped despite the lack of practice just as the teacher in the videos said it would. The only problem is I kept falling asleep watching the videos.

In the photo above is a wax carving tool I modified to be similar to the shape of a Ray Gonzales Hooked Skew Chisel The shape of his skew chisel intrigued me and there are many good reviews about it. However it does not come in a size for carving small scale miniatures so I decided to give it a go to make one. After I modified the shape I took it to my neighborhood knife maker for a professional sharpening. The tool looks bigger than it is as it was much closer to the camera than the carving.

I really like this little tool, it does a great job of detailing in tight spaces. The curve keeps the tips from digging in when using it for background cutting. It can also be used as a scraper for smoothing out problem areas. The cutting edge is 7mm from tip to heel. I would like to have more of a hooked point at the heel but that will have to wait until I have my knife guy custom make me one from high carbon, high quality steel that will hold an edge for a long time.

February 23, 2012

Cherry spoon finished!

photo copyright Karin Corbin 2012


photo copyright Karin Corbin 2012

My little spoon is done! If you click on the photo to enlarge it you will see how perfect the grain of the Flowering Cherry tree branch was for the project. Such a lovely piece of wood. The final carving and finish work is done with the edge of the knife using a scraping motion that goes with the grain direction. Shearing the wood leaves a smoother finish than sanding.

Time to get back to carving practice with pear wood and some medieval designs.

February 21, 2012

Cherry spoon


A miniature spoon made from a freshly cut branch of Flowering Cherry.

Driving along the street yesterday I saw a pile of branches sitting by the road waiting for the yard waste recycling pickup day. The branches are green wood, they were only cut a few days ago.

I have been following some articles on carving full sized spoons. They all say to work the wood when it is freshly cut as it easy to carve then. And so it is....
At this small size there seems to be no danger of splitting while drying. The surface is rapidly drying as the carving is being done.

Most of the work was done with a knife. I only used a gouge to scoop out some of the bowl material. I did the basic carving last night and after air drying all day I did the finish sanding tonight. You can't sand a wet surface without getting a lot of fuzz. I used a diamond coated, ball shaped, burr to help sand inside the bowl.

The Flowering Cherry branch was very fine grained. It does leave some pink color near the bark when peeling it and also some pink by the pith when I split the branch. But most of that fades away as the surface air drys. Any kind of species of fruit tree pruning should work for making a miniature spoon. But the base of the branch needs to large enough in diameter the spoon fist onto one half of the diameter plus some extra as you have to avoid the pithy center.

Time to get out the magnifying lenses and do the final touch up on my spoon. You all know by now that the macro photography reveals all the flaws, tiny things you can't see without high magnification. The transition between handle and spoon is too thick, overall the spoon needs more to be thinner, more delicate looking. Chunky looking miniatures are rarely going to work in a miniature setting other than a child's dollhouse.

Get out your pruning tools and head outdoors!

February 7, 2012

Celtic Heart


Once a month I get together with a few girlfriends to play with miniatures. We take turns hosting the gathering. This month I hosted the group at my workshop. The projects we choose vary, sometimes we work independently other times someone will suggest a project to share. I offered to show them how to do some miniature sized carvings and since Valentines Day is coming up I chose a heart design from a Dover Publishing book of Celtic Designs.


I had a piece of poplar wood that was cut thin and wide enough to fit the design. I have stained my piece to look like old English Oak for no particular reason other than I felt like it. After I was done carving the piece I cut around the outside edges with a jeweler's saw.

I might turn this project into a necklace or maybe I will put a pin on the back of it. I suspect I suspect it will become a random, surprise gift for someone on Feb. 14th. Maybe my favorite barista will be the one to end up with it.

I used Dockyard brand miniature carving tools for this project. They come in sets or as individual pieces. The sizes range from 1.5mm up to a 5mm width. Two are two issue I have with the Dockyard chisels, first is they don't hold a sharp edge for very long and second there are no shallow or medium sweeps available on these U gouges, only a full half circle, what is called a deep sweep, is available. This really limits what you can carve with them unless you grind them down to create a shallower sweep. A better option for much higher quality made miniature sized carving tools is to buy Ashley Iles block cutting gouges. Available in the USA from www.toolsforwoodworking.com.

photo copyright Karin Corbin 2012


photo copyright Karin Corbin 2012


It is a trick to sharpen a tool that small. The chisels are easy enough to deal with but the gouges used to be a challenge for me. However I just learned a trick that makes it easy. Take a piece of softwood such as pine or basswood and use the gouge to carve a groove into the wood. Each size of gouge gets its own custom groove. Put some honing compound in the groove and use a pull stroke on the gouge to polish the beveled edge at a 20 degree angle. The honing compound quickly brings up a lovely mirror like polished surface and it creates a razor sharp edge. On the side edge of the block turn the chisel over and use the inside curve against the wood to carve a matching shape and use it to burnish the inside edge to remove any burrs left from the honing process.

As you are carving and the carving tools start to feel a bit dull give then a few strokes on the honing block and they will be sharp once again. No need to regrind these tiny tools if you take good care of them.

December 7, 2011

Visit from Santa...

Some women love getting new jewelry for Christmas, I love getting new tools.
photo courtesy of Fast Cap, see link below to purchase this item


My new stocking stuffer tool I just got for Christmas from my friend Don is a little square that has magnets in the base. It is very nice for squaring up tools with steel tops such as the band saw, scroll saw, drill press table etc. But it is also a wonderful jig for squaring up miniature projects. You know those metal boards you use with magnets for assembling things? Yes, it will work great on those for holding tall pieces in upright positions. How cool is that? The measurements are in inches on one side and metrics on the other.
It is marketed by Fast Cap
http://www.fastcap.com/estore/pc/viewPrd.asp?idproduct=9935

Rockler sells them too.
http://www.rockler.com/product.cfm?page=22118&filter=magnetic%20micro%20square

July 4, 2011

Sleepless in Seattle

Today we took the bikes along the canal path over to Lake Union and spent the afternoon messing about with boats both big and small. The Center For Wooden Boats always has an open house on July 4th with lots of activities for all ages. There are several houseboat communities along the shores on the way there.


Honestly I was not even thinking about scale models today but there they were despite trying to escape such things for the afternoon. Might as well enjoy them since I was not responsible for making them on a holiday. There has been a pond boat building program at the Center for many years. This year the land just outside the Center got a landscape makeover in which they installed a sail boat pond. How much fun is that? One of the 4th of July activities for kids is building toy boats.

The photos below are of the workshop where the pond sailing program is held. The program is in conjunction with a City of Seattle Alternative, middle school. What a fun way to learn math and science!
photo copyright Karin Corbin 2011


Now for something to inspire you to make a marine related miniature scene. The small shed at the Center for Wooden Boats that serves as their boat rental office. I love the oar for a weather vane and the decorative shingle detail.
photo copyright Karin Corbin 2011

My favorite boat of the day, a small steam powered launch.
photo copyright Karin Corbin 2011

June 6, 2011

Sunset Hill


This evening an errand took us up to the top of the bluff in my neighborhood. There is a birdhouse up there that I built in the early 1990s so I stopped by for a quick photo shoot. It is one of the first birdhouses I sold. It has that shabby chic, antique look after spending nearly 20 years out in the rain and wind. I think she looks pretty good. It has sheltered a great many baby birds over the years, there is nest building going on right now for the newest generation.

I am thinking about making a version of this bird house scaled for dollhouses. Would you all like that?

A few blocks away from the birdhouse I came across a perfect glitter house project. I will start making it this summer. It works for both European and American scenes, the Tudor revival era from the 1930s. The house has a lot of interest without being overly fussy. It looks great from all 4 sides, not often I come across a house that does not need a lot of modification. I will make some changes to the picture windows to give them a bit more of an old world feel. Those windows look out to the same view I have from the beach.

I adore the twin gable peaks with the chimney between.

May 9, 2011

Home Port

Today is photolog day as I had my camera hooked to my belt loop when I was out for lunch. Click on the photos to enlarge them, they look much more colorful that way.

The marina we live in, I took this photo from the end of the public fishing pier. This view is looking to the south, my workshop is a few blocks south of all the boats.

It has been a very cold and rainy spring, the coldest recorded in Seattle. So no pretty sunny photos for you, this is a reality show today. But my neighbors, the turtles and the duck, found some diluted solar radiation on their pond. I suspect this pond was the home of the lost turtle that wandered into the parking lot at my workshop. A turtle could walk that far in a day or two. We are hoping our young friend who was given the turtle will be accepting of returning the turtle to its natural habitat. I think she has found the turtle to be a rather boring pet so I imagine she will be interested in the project knowing that she can still visit her turtle.

I was feeling a little stir crazy at lunch time today so I hopped on the bicycle and road a short distance up the street. For two dollars you can get a hot dog and sit at a counter with a water front view. The Little Coney burger joint is right next to the marina we live in and it is located in a water front city park with a very nice beach, meadows and wooded hillside. Miles of walking trails and it is at the end of a city wide bicycle trail system. The photo below is also from the end of the pier but looking to the north, that is the beach at the park. The beach continues on around the point.


Looking at the these photos you would not think I lived right in the middle of a major metropolitan city. I can see open space, water, beaches, mountains and trees for miles and miles. There is a miles long wooded bluff buffering us from the city. My little bit of heavenly retreat on the planet earth that has all the conveniences and cultural opportunities of modern urban living. Once in a while we even get warm sunny days!

April 20, 2011

Final Cut


photo copyright Karin Corbin 2011

The last pair of new scissors I purchased this week also have a micro serrated blade that helps capture the fine fiber so it is easier to trim it off. They are very sharp. I purchased them at a store that sells stamps for crafters. Micromark also carries this little scissors. I think I will try and order a curved blade version of these to add to my collection. They are not expensive, under $12.00 a pair. They are a great tool for that final little trim. Now that I have taken a photo I can see that wee bit more of trimming that needs to be done.

I hereby give myself a certificate in micro scale thatching competence! What a relief to get all that stuff sorted out. But the work is only part way done as now I have to photograph and write the tutorials for the thatching kits.

That is a common sewing pin in the photo next to the penny. Scale is such a funny thing, in the photo the pin looks more like a nail.

April 19, 2011

Thatching tools


Every time I create another prototype for the Shamrock Cottage I do a little more thatching practice. The other day my thatching frustration resulted in one of those ah ha! moments. I was using the wrong kind of scissors for the job.

What I needed were scissors with micro serrations on one of the blades. The small hairlike fibers will drop into the grooves and stay put instead of skating away across a smooth blade. What a huge difference those scissors made, it is so easy now to get a nice even thatching job.

There are two pairs of micro serrated scissors in the photo above. The ones with the plastic handles came from a beauty supply store, they are made for trimming hair. I chose the inexpensive pair that was less than $15.00. I use those for the basic level and bevel cutting.

The second pair has a small, arrow point curved blade that is only half an inch long. Those are perfect for digging in and feathering out any areas that have too long of strands or areas that look somewhat clumped and ridged. I call them my blending shears. I found those little curved scissors in a store that caters to fishermen who like to tie their own flies. The exact same micro serrated scissors are also available from stores that cater to embroiders. To find a pair like this the keywords to search on are ... micro serrated arrow point curved scissors .

photo copyright Karin Corbin 2011


The other essential tool in the photo is a fine toothed wire brush. The fibers must all be combed in the right direction or your roof will look like a recently vacuumed carpet with fibers going in all directions.

March 18, 2011

Japanese Influence

photo copyright Karin Corbin 2011


photo copyright Karin Corbin 2011

photo copyright Karin Corbin 2011


Architecture from all over the world has been a big influence on my artistic life and the lives of those who commission my work. The two structures shown above, one a pagoda style birdhouse, the other a very large light fixture, were commissioned from me by a woman who loves Japanese architecture. She does not live in a Japanese house but she does live on a bluff on an island.

The last time I visited there about 4 years ago there had been weeks of heavy rain storms and the bluff was in danger of collapse, in fact some of it had already sloughed away and the pagoda birdhouse was then in real danger as it very close to the edge. I have no idea if it survived, I am afraid to find out as I would mourn the loss.

I feel the loss of the lives and also the loss of the buildings and cherished gardens in Japan.

More of the Asian influenced birdhouses I have made are below.

photo copyright Karin Corbin 2011

photo copyright Karin Corbin 2011

The cherry trees are starting to bloom, it is time to build real birdhouses again. This year I will also make 1:12 scale birdhouses including a miniature of the one above with the slate roof on it. The miniature will also have a real slate roof.

March 15, 2011

Shamrock Cottage


Top O' the mornin to you all!

In the spirit of St. Patrick's day I planned a surprise for the blog this week. I just finished this prototype for a new 1:144 cottage kit. The roof is gold, the treasure that was found at the end of the rainbow that was over my workshop this week.


photo copyright Karin Corbin 2011


A closer look at the detailing on the window and doors. The ruler is to help you understand the size of this wee wonder. Click on the photo to enlarge it.

I am linking this post to "White Wednesday" at the Faded Charm Blog. Be sure to visit it is fun too see all the White Wednesday links.
http://fadedcharmcottage.blogspot.com/2011/03/white-wednesday-91.html

February 22, 2011

Ladder is finished

photo copyright Karin Corbin 2011


Here is the ladder that will be used in the 1:12 scale dollhouse. I made it with a bit of a nautical influence from the style of companionway ladders. The imagined resident took a bit of care with the crafting of this functional object. It is not primitive rough work although it does show some wear from feet and a bit of dirt of course!

I posed it against the outside wall of the structure as it would have been too dark to photograph inside the house. I was not in the mood to setup lights for a proper photoshoot this evening. Don't you just love the duct tape that helps hold the sides of the uncompleted dollhouse together? I am looking forward to the day when the interior is finished to the point where I fix the walls together permanently. But getting there is fun and you get to go along for the journey.

I really enjoyed making this ladder, it was a nice change. But now I have to get back to the paper houses for the rest of the workday.

February 9, 2011

Valentines and Doves

photo copyright Karin Corbin 2011


I found some lovely pale peach paper the other day, it looks great with the pearl white. I liked it so much I decided to make a Valentine's Day version of the Dovecote. The Cottage will be done in this color scheme too but it won't be finished until the weekend.

I think the peach will become one of the standard color choices I will be offering.

January 19, 2011

White Wednesday

photo copyright Karin Corbin 2011

I have done a little resizing on the 1:144 dovecote design to match it's scale to the small cottage. Today they are dressed in winter whites. Christmas might be over but winter is still going strong with lots of new snow on the beautiful mountains that I see when I take my walks. We had two inches here at the workshop the other day.

I have noticed a real trend in blogs that feature all white interiors in homes. I thought it would be fun if I offered these little houses in an alternative color scheme. I think they are very charming this way. My material choices are actually ivory white and a pearly, iridescent golden white along with a bright white for the landscape.  The pale turquoise door adds just that little bit of spice to the look.

Yes, these two finished houses are for sale, they are $35.00 each. Just write to me to order them, karincorbin at gmail. The cottage is 2.25" (55mm) tall at the peak of the roof.

photo copyright Karin Corbin 2011

When I glanced over at my countertop just now it looked like a tree farm in a snowy field, in miniature of course. I had to bleach some bottle brush trees for the white houses. After bleaching and rinsing I rubbed white paint into them. I use a piece of white styrofoam scrap as my drying rack. I certainly did not intend to create a snow scene. The front edge of the piece looks as if children had been making a whole bunch of snowballs in anticipation of defending a snow fort.