July 13, 2012

Dollhouse Dormer Part 3

Cutting dormers for the Elizabethan birdhouse part 3.

Today I am cutting the window openings in the dormers using a miniature table saw with a 3 and3/8" diameter blade. 

First thing to do is draw lines right onto your tablesaw top. Use a felt tip marker and  a straight edge draw a put a line across the top that is the same width of the saw blade that runs parallel with the blade. Then draw a line perpendicular to that line to indicates the center of the saw blade's arbor hole.
photo copyright Karin Corbin 2012

That intersection of those two lines is the center point of where your blade will come through when you raise it up through your panel.

The first two sides of the window openings, top and bottom, were done using the table saw fence against the bottom edge of the dormer. The top point of the dormer lines up with the line indicating center of the arbor.

The last two cuts are created by placing the bottom edge of the dormer against the miter fence and using those lines on the table top as my reference point I line up the dormer to center the blade on my cutting line.
photo copyright Karin Corbin 2012

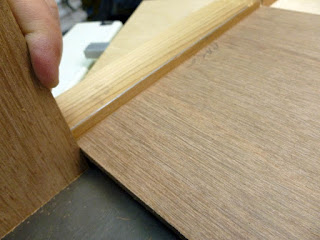
Because my window is centered on the peak of the dormer I have used double back tape to stick to temporary plywood fences to the top of my table saw (those are the light colored wood). Now I can just flip the dormer piece  over after making the first cut to make the second cut without recalibrating my position.  Note in the photo that I have clamped the dormer to the table saw top to make these cuts. When it is possible to use clamps I always take the time to do so instead of risking my fingers.

Cutting dormers part 1
Cutting dormers part 2

July 4, 2012

Got Birds?

photo copyright Karin Corbin 2012

photo copyright Karin Corbin 2012

On holidays and weekends my two  cats get to go out into the hallway. They love to run up and down the stairs playing tag. Sitting in the birdhouse that now serves as a hideout, ready to launch a sneak attack, is one of the games they play. 

A few years ago they actually did catch a big fat mouse in this hallway at the bottom of the stairs.  I am sure they would be thrilled if another mouse came into the building.

June 20, 2012

power strop to go

photo copyright Karin Corbin 2012

 More work done today on my new carving stand including a way to power hone my tools for those scary sharp edges that cut wood as if it were butter.


My carving stand was built using a "hide-a-horse", lightweight (7lbs) folding saw horse. I love it, it sets up in seconds but folds up into a very small package easy to store under a bed or in a closet.
Watch the video on this link to see how it works http://hideahorsefoldingsawhorses.com/

 A proper tool stand was made to fit. It is screwed to the base plate, not to the saw horse. The screws allow me to take this carving stand apart and flat pack it. If I wanted to I could then  put the pieces of the stand (minus the saw horse) into a suitcase and fly away with it.  I put T-nuts into the back side of the plywood to hold the vise and used plastic knob screws to go into the T-nuts. That make it fast to take apart but still strong. I have put cork sheeting on the underside so the tool stand so it can be used on its own on a table or desk.

I put a layer of thin adhesive backed cork sheeting over the magnetic, stainless steel knife bar. I purchased the bar from my local Ikea store but they can also be found on Amazon or Ebay.  The length of the bar is what determined the size of my carving stand. I like the stand to be that long because it keeps the C clamps that attach the stand to the sawhorse, desk or table top from hitting my knees. Also it gives me lots of room for hanging up carving tools. The cork sheeting is shelf liner from the Contact brand. You can find it in hardware, home center stores and places such as Walmart.
photo copyright Karin Corbin 2012

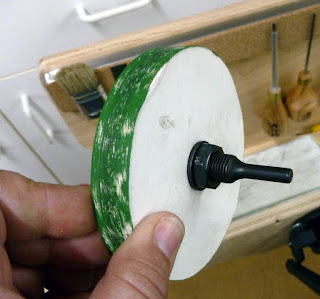
Another chore today was mounting a honing disk onto a mandrel so I could use it in my battery powered drill motor. This kind of mandrel can be found in hardware stores. The honing wheel is made by gluing layers of mat board together.  Be sure to carefully cut the circles so you don't have to do a lot of sanding to true up the disk surface after the glue is dry. Use the motor turning against a sanding block. But to get that chore done even faster turn it with the drill motor against a running power sander.
Add captionphoto copyright Karin Corbin 2012
 The green color on the wheel is honing compound. The wheel does not need to be charged with compound very often, it last a good long while.


June 10, 2012

Where the Wild Things Live

photo copyright Karin Corbin 2012

The good thing about travel is all the interesting local characters you meet. This weekend I am doing a bit of international travel. Not all that far from home, it is only two  hours of a drive from Seattle to the city of Vancouver British Columbia, Canada. It has been a few years since I took a leisurely trip here with no agenda other than having a fun and interesting time.
photo copyright Karin Corbin 2012
Can't you just hear this big guy saying "let the wild rumpus begin"?
Look closely at him, each of the horns on his head has a face carved into it.

These photos were taken at the Museum of Anthropology.
photo copyright Karin Corbin 2012

photo copyright Karin Corbin 2012

photo copyright Karin Corbin 2012

photo copyright Karin Corbin 2012
The scale of the items in the museum ranges from massive on down to tiny miniatures. The collections have a broad range. The majority of the museum collection is focused on North West, pacific coast native art. However there are hand made items of many types from all over the world. There is also a section of the museum devoted to early European Pottery.
photo copyright Karin Corbin 2012

photo copyright Karin Corbin 2012


Outside in the "back yard" are recreations of dwellings. Many swallows were busy swooping around the hill and over the pond.


photo copyright Karin Corbin 2012

The Austrian  tiled stove from the museum's ceramics collection. There are also rooms full of beautiful baskets, Greek pottery and of course thousands of carvings in display cases and drawers.


I am staying at a hostel on the campus of the University of British Columbia in Vancouver. What a great location, just a few blocks from the Anthropology Museum. Right next to the hostel is a lovely Japanese Garden. For only $33.00 a night I have a nice private room in an incredible location. It is an easy scenic, waterfront hugging, 20 minute drive into downtown Vancouver. The whole of the campus is beautifully landscaped and it is surrounded by a huge regional park with hiking and biking trails. How often do you get a location to stay that is forest, waterfront and right in the middle of a major metropolitan city? This certainly does not feel like traveling on a small retirement budget! Today I am heading to the dollhouse miniature show that is being held in Vancouver this weekend.But first comes a short hike in the Universities Botanical Garden followed by breakfast at a waterfront park.
photo copyright Karin Corbin 2012

June 5, 2012

Cutting Dormers: part 2

photo copyright Karin Corbin 2012
Cutting dormers for the Elizabethan birdhouse part 2.

This time I am using the same miter slot sled jig I made in part 1  to cut a dormer for the back of my structure and also  the two side gable  ends. These pieces are triangular without any vertical side lengths. I have changed the angle of my miter fence using the 60 degree drafting triangle and now the base of the triangle will rest against the fence unlike in part 1 where the vertical sides were resting against the fence.
photo copyright Karin Corbin 2012

The first step was to cut a piece of material to the width of the base of the triangle given in  my measured drawing.
photo copyright Karin Corbin 2012

The right side of my jig was cut off by the saw blade so that is an easy indicator of where the actual cutting line is and I will make use of it as the registration for the point of my triangle. All I have to do is place a scrap piece of plywood at the corner where the fence and that right side of the jig intersect. Then I butt the material I am using for the dormer over to that location, remove the scrap and while holding the material down on the jig against the fence I slide it on through the saw blade to make the first cut. I always turn off the saw motor and let it come to a full stop before removing the part from the jig or trying to remove the waste cutoff piece.

photo copyright Karin Corbin 2012
Now flip your material over, register it again to that same intersection as in the last step (don't forget to remove that scrap you used to located the corner of the triangle) and then cut the last side of the triangle. The peak of your triangle will be perfectly centered across the width and that means it will also be the correct height. This is a very simple method once you get the hang of making triangles this way on your table saw. But if you are going to do lots of them exactly the same size for a production type of product then use a stop block on the left end of the fence instead of registering your pieces it to the corner each time.
photo copyright Karin Corbin 2012
I will do a post on making the roof cuts for the dormers later, it involves making compound cuts, a bit more complicated as you have to make a left and a right side but  it is  also done with a miter slot jig.

Elizabethan birdhouse

Cutting dormers part 1

Cutting Dormers: part 1

photo copyright Karin Corbin 2012
Cutting dormers for the Elizabethan birdhouse part 1

I still remember the days when I did not know how to approach making things like dormers for a miniature building. Lack of knowledge and often a lack of tools is where we all begin. This being a teaching blog I will show you how I am cutting the pieces for the front of a dormer that has a steep roof pitch. There are a number of methods to make these cuts and I don't always make them this way.

The miter angle fixtures that come with table saws won't rotate past 45 degrees but for this house I have to cut a sharper angle than 45. The method I chose  is to make a single runner miter sled for my 10 inch table saw. I have a number of pieces to make using this particular angle so the jig will be useful for insuring all the parts get cut to that same exact angle without variation.
photo copyright Karin Corbin 2012

The runner that goes in the table slot could be made of hardwood or if it is only going to be used a few times pine or basswood will also do the trick.  I am using a metal slide since I have one that I can unscrew and use it again and again for other jigs if I wish. As you will see I am using materials out of my scrap bin for the sled base and for the fence as well. Actually the plywood came out of a neighbor's scrap bin, I am not too proud to use his leftovers!
photo copyright Karin Corbin 2012

As I am cutting this roof at a 60 degree angle I am using a  drafting triangle with a matching angle to accurately establish the angle. I place the edge of the triangle right against the saw blade being sure it is not resting on any of the saw teeth, sneaking it between them, touching only on the flat of the saw blade. I have attached the fence to the base with double back carpet tape, it is plenty strong enough to hold it in place without shifting. I am using double back tape because I am going to reposition that fence to a couple of other angles for other dormers and gables and dormer roofs before I am done with all the cutting on this structure.

This first dormer front wall I am cutting has some vertical sides on it. Other dormers and gables I will cut are simply triangles with no vertical sides on them. I am showing those in other postings.

photo copyright Karin Corbin 2012

First the dormer plywood material is cut to width. Then I mark out how tall the vertical sides are. I make sure the mark at the point where the roof pitch starts gets transferred on down the edge of the plywood. That mark is going to be aligned with the cut edge of my miter jig. See photo above, it will enlarge if you click on it. This is a quick, simple and accurate method of aligning the starting point of the cut for the sloped roof line on the dormer.

photo copyright Karin Corbin 2012

The first cut goes just past the point of the peak.
photo copyright Karin Corbin 2012

Then the board is flipped, aligned to the mark and the second cut is made.

photo copyright Karin Corbin 2012

Notice how my board is left longer than the length of the small dormer, it gives me good registration against the fence. I will cut the second dormer piece I need from the other end of the board. That butterfly shaped piece left in the middle will still be there for a nice long registration against the fence.

That center waste piece has complimentary angles that will soon be recycled into making yet another miter sled jig for cutting the timber frame trim pieces that will go onto this dormer and on the gable ends of the house. Be sure to watch for opportunities like this because they give you those exact matches on angle cuts that will fit perfectly onto your house parts. I will show you the jig I make from it later on in this blog.

If I was making a dormer with equal side lengths I could have used a stop block on the fence for the second cut. But these dormers are on each side of another third dormer that sits between them and the peak is not centered across the width of the dormer.  You can see the dormers I just cut on the CAD model in the image below. They are on the left and right of the center dormer. Elizabethan birdhouse image below.
photo and design copyright Karin Corbin 2012
Link to Cutting Dormers: Part 2
Link to Cutting dormers: Part 3

June 2, 2012

Recipe For A Birdhouse


Before I started cutting the Elizabethan Birdhouse I thought it would be fun to stack most of  the ingredients on the counter and list them as if this were a scratch cooking blog rather than a  scratch miniature building blog. So exactly what does go into a project like this?

Lumber:
1 sheet of 7mm marine plywood
1/4 sheet of 9mm marine plywood
4 board feet or so of Black Cherry
1 board foot of  Western Red Cedar

Bricks and Chimney:
Block of raw red clay
Glazing stains
Grout
Polyurethane adhesive caulk to stick the kiln fired pieces to the structure

Windows:
Antique style, seedy (little bubbles) glass with an iridescent coating of gold tone with glows of blue, green, red. Helps obscure daylight view into the structure but lets light shine out at night
Roll of narrow copper foil tape
Solid core solder
Flux
Chemical patina solution to darken the solder
Window Glazing Putty

Door hinges:
Brass Sheet Metal
Brass Screws to secure hinges to door frame
Brass Brads to clinch the strap hinges to the door
Chemical patina solution to turn the brass black

Stucco:
Bucket of exterior grade, elastomeric "Venetian Plaster"
Artist acrylics to add aged detailing to stucco
Primer paint 

Roofing:
Marine Plywood
Thin Fiberglass cloth and epoxy with filler  to seal and reinforce roof joins
Copper sheeting to be cut into shingles
Solder
Blue-Green Chemical Patina Solution

Birdhouse Hole Entry:
Copper Plate from recycling sources
 Blue-Green Chemical Patina Solution
Solder
Polyurethane Adhesive 

Adhesives:
Acrylic adhesive caulking for the wood to wood joins
Polyurethane adhesive caulking for metal to wood joins

Misc supply:
Noel and Pat Thomas "Bug Juice" to stain the Black Cherry wood a dark gray
bronze screws
galvanized brads

LED Lighting:
Not shown as I have not purchased the LEDs yet

Instructions:
3D CAD Model for reference and to generate measured parts drawings
There are no assembly instructions for the more than 1,000 pieces most of which will be fabricated out of that stack of materials.

There is no point in asking me how many hours this will take to complete as I have no idea. It is a labor of love and will be going to my brothers house. There is no deadline which is a good thing as I lost most of last year's labor time to due health issues and this year I can only put in time on my "better" days which means it is a slow cooked recipe. But perhaps the flavor of it will be all the richer for that fact.


May 22, 2012

Nonsuch House


 Above are the front and rear facades of the new birdhouse. The design work is now 95% finished. The roof edges still need trim, a few other little trims pieces to tuck in here and there. The carving details will be designed later when I have the real parts to work with.

This Elizabethan birdhouse has been named "Nonsuch", not to be confused with nonsense. Unless of course you realize that non-sense means I haven't got the sense to know better than to use a tiny artist trowel to put stucco in between that many jig sawn puzzle pieces. I foresee watching/listening to a great many movies and audio books to get me through those endless stuccoing sessions.

Nonsuch is an old English word. Henry VIII had a Nonsuch palace done in the Tudor style, long since destroyed.

There was a Nonsuch House in Elizabeth I time, also long since destroyed. Now that was an interesting structure, it sat on top of the Medieval London bridge, it too had a passageway through the center and it was also timber framed. The structure was prefabricated in Holland, taken apart, shipped over and then put back together on top of the bridge. I wonder if it was burned up or taken apart and the pieces reused to make other buildings?
Photo of a model of the old bridge at the Dockland's Museum:
http://www.flickr.com/photos/bensutherland/6871737215/in/photostream/

So Nonsuch it shall be because it is after all a bird palace and there is none such other birdhouse around although there are other real life, very large, Elizabethan birdhouses also known as Dovecotes.

May 6, 2012

Dollhouse Hill

photo copyright Karin Corbin 2012

The hillside  above my workshop is the land of 1,000 dollhouses waiting to be made in miniature.
photo copyright Karin Corbin 2012

It is a beautiful sunny day here so I went up on the hill to take a few photos to share with all of you.

photo copyright Karin Corbin 2012
I love the roof lines of the Tudor cottages with all their clipped gables, quirky dormers and little bay windows.
photo copyright Karin Corbin 2012
If you look at the house directly above and the one shown above that you will see they are essentially the same house. But one has clipped gables, the window in the gable is different as are the shapes of the dormers. The chimney is placed somewhat differently but the overall foot print of the house is almost identical. It is an old builders trick to keep all the houses in a neighborhood looking very different but compatible with the fashion of the era. There are thousands of these 1930's Tudors in Seattle, some brick faced and some covered in wood siding.
photo copyright Karin Corbin 2012


Birdseye view of my workshop and neighborhood

You can click on the photo above from Wikipedia to enlarge it. The yellow arrow points to the building my workshop is in. The neighborhood I was photographing is adjacent to my workshop  up above me on a steep bluff. This  photo also shows the ship canal that leads from the salt water on through to several of Seattle's lakes. The ship canal has a series of locks to raise (or lower) the boats as the lakes are higher in elevation.

The photo below is one I took today on the little public beach adjacent to the workshop. Lots of boating activity this first weekend of May.
photo copyright Karin Corbin 2012

May 5, 2012

Feathering the nest

The male, black capped chickadee, caught in the act of feathering the nest.

April 30, 2012

Parisian Houses in 1610


An engraving showing a street in Paris in 1610. The subject is the assassination of Henri IV, king of France. Photo from
http://en.wikipedia.org/wiki/File:Assassination_of_Henry_IV_%28Henry_IV,_King_of_France;_Fran%C3%A7ois_Ravaillac%29_by_Gaspar_Bouttats.jpg

Are you surprised to see the Dutch influence on these houses in Paris?

The old houses such as these were all destroyed to make way for new buildings, part of the plans to create the most beautiful city in the world. Of course it was not done all in one fell swoop. A couple of Napoleons, war, fire and of course decay all played a part. Oh well and who is to say it was not well worth the results? It is certainly a more liveable and elegant city compared to having winding streets of crumbling buildings.

The Dutch style was also an influence on the brick houses of Elizabethan England in the same historic period.

Elizabethan Gatehouse Mockup

Front of house

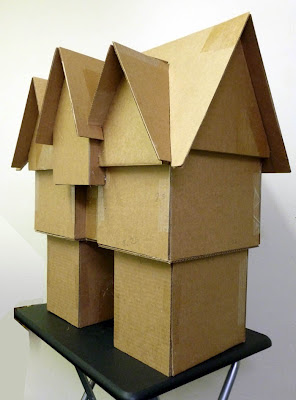
It feels good to have finally settled on what I wanted to make for my birdhouse project. A bit of research was done, then next step was making the basic CAD model for the massing of the Elizabethan birdhouse and now I have the cardboard mockup almost finished.

Back of house


The cardboard model turned out very close to my vision. But looking at it I decided I will add a half inch to the height of the second story and trim a half an inch off the lower edge of twin dormers on the front. Those kind of subtle changes are why I take the time to mockup the project in cardboard, I can see these subtle things more clearly. It will be very easy to make those two changes in my CAD model. In the image below you can see where I am querying the CAD model for some of the dimensions I needed for cutting the cardboard parts.

Next I will try adding two fireplace chimneys to the roof of the cardboard model. Chimneys are a lot of work to make and they are also an issue in terms of holding up to weathering outdoors. Therefore I will have to decide if I feel they are absolutely essential or not. They are a significant design feature on Elizabethan buildings so I must try them to see if they contribute to the overall impact.

After that chimney decision is made I will start putting all the details into the CAD model, the doors, windows, trims, brackets, timbers, etc. This birdhouse is really going to be loaded with lots of architectural details and carvings.
Cutting board and tools

There will be two birdhouse boxes built into the first floor. This piece is going to be sent to Texas so I will be sure to add lots of insulation and cross ventilation so the bird boxes don't turn into ovens in the hot sun. A historic form of early settler's house in Texas is called a "Dog Trot Cabin". It is basically two cabins joined with an open roofed breezeway between them. That design feature cools the building. If you look at this Elizabethan Gatehouse design you will see that I am going to take advantage of the same kind of cooling feature for my feathered friends.

The second floor and attic dormers will have glass windows in them. Inside the structure I will add low voltage LED lighting to shine out them at night. So not only is this piece going to function as a birdhouse, it is also a lamp and of course first and foremost it is an outdoor sculpture.

It could also be a dollhouse as I have designed it in 1:12 scale but than was not what was requested and it would take a lot more time too.