July 30, 2009

Torchis


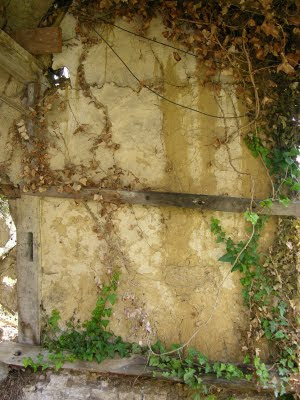
Torchis is the French word for the more commonly known wattle and daub. The daub to be more specific.

I know from the newsgroups most dollhouse builders are using lightweight spackle for their plaster. That is fine for the interior of the house and newly plastered exteriors but not for a character house where the exterior plaster is wearing away or on structures where the torchis was never rendered over the top with smooth lime plaster. I found quite a few of those houses on my journey.

For my new series of houses that I plan to build this year I wanted to develop a new product to use to create that rougher texture in scale. I have been busy playing mad scientist this morning and am getting close to being happy with a mix of various things. I want to wait a week or so to see how strong it will be and how well it will adhere after fully curing. By the time I am ready to apply stucco material I hope to have something very realistic to 1:12 scale to use.

In the meantime you can look at the photos above that I took of real life examples and also do an internet image search using the word torchis. It will open up a whole new set of photos that searching on wattle and daub won't give you. Of course the danger is you will never again be satisfied with only lightweight spackle on the exterior. A wicked witch cottage would not look right all pretty and pristine. Yes I am going to do a witches cottage, I designed it many years ago but never got around to building it for reasons I will explain in a later post.

July 29, 2009

Willows and Water

photo copyright Karin Corbin 2008
Monet's Water Lilly Garden

photo copyright Karin Corbin 2008
Le Chateau De St. Germain De Livet

photo copyright Karin Corbin 2008
Ancient Dovecote on a Normandy Farm

I thought I would treat you all to a deep visual drink of cool and tranquil waters from Normandy, France. I took these photos in June of 2007.

Record breaking heat here in Seattle today. I am very happy that my workshop is somewhat cave like, warm in the winter and cool in the summer. Despite temperatures in the city of over 100 degrees my workshop maxed out at 72 with no air conditioning. I will be camping here tonight, too hot where my sleeping quarters are.

Today I started setting up my new workshop assistant, a tabletop sized CNC router. I feel like I am living in the future with robotic versus human assistants.

I can't wait to see what happens tomorrow when I get it up and running and cut/carve from a few of the sample programs it came with. The first useful thing I plan to set it to making is a custom fence I have designed for the Harbor Freight Mini Miter Saw. I am hoping my assistant will save me a lot of time with making jigs and also eliminate the need for many of the router jigs I often create for dollhouse and birdhouse building. What it can never do is create a hand crafted look so there are limits to its uses. A routed edge will never look like a hand carved edge but it can rough out the edge for me to finish detailing. It can't make worn and weathered looking carving or timbers but it can rough out some types of carvings and cut some types of shapes for me. It can do a good job of carving out brick mortar lines but it can't fill them or texture the bricks. Most unfortunately it can't lay individual shingles on a roof but it can rough out clay barrel roof tile shapes and help make masters for molds.

*Please note that all images are copyrighted. These are my personal photographs that I took and they may not be used without my written permission*

July 27, 2009

Hinge project

photo copyright Karin Corbin 2009
Today I was able to spend some time making practice hinges for my doll house cellar door. My first practice pair are shown above, they are not finished yet.

The camera is a great critique tool, turn on that macro lens function and you simply can't hide the flaws in the work. I can see that the sizes are not a close enough match, the top hinge is just a little too wide as it enters the details on the end. Not enough emphasis on the taper on that strap. The brass looks like iron under room light but shows up brassy under the camera flash, that won't do as dollhouses do get photographed.

I am certainly no blacksmith yet. Good thing this is a rustic dollhouse. I will need to do several more pairs before I get it all figured out. I do want them to look weathered and rusty which is a good thing. That way I don't have to drive myself crazy trying to get them looking like a Tiffany jewelry piece.

Getting brass to look like rusted steel without putting paint on it is tricky. But a little aluminum oxide grit blasting with a air(brush) eraser and a combination of several chemical patinas has got it heading in that direction. I will have to record what I do, in what order and what formulas I used that worked.

I need to work on the pintels next. A pintel (pintle) is a hinge pin that slips into the single knuckle on my hinge strap. I am not quite sure which way to approach the fabrication of them so I suppose it would be best to try several ways of making them and see what looks best.

I try to make most of the components that go into my projects. I want them to be as unique as possible while still referencing historical architecture sources. This approach is like slow cooking versus fast food. It takes extra time and I have to learn a whole lot of techniques.

The spiral curves on the end of the strap are called rams horns. Those were fun to make with a special type of pliers, the package they came in calls them coiler pliers, but they are also called looping pliers or wrapping pliers. I took a several hours of one on one instruction from IGMA artisan Alan Hamer several years ago and he introduced this handy tool to me. Alan used to be a blacksmith and took up making the same kinds of items in miniature after he suffered injuries that would not allow him to do full size smithing. Alan teaches at the IGMA school in Castine, Maine.
photo copyright Karin Corbin 2009

July 25, 2009

Proxxon & Micromark table saw adjustment

photo copyright Karin Corbin 2009

Another long technical posting, not much fun to read or lovely to view but you won't find the information on how to do this adjustment on a Proxxon FKS/E anywhere else on the internet so I think it is of value and so will others. This adjustment method also works for the Microlux Mini Tilt Arbor Table Saw sold by Micromark. These two are nearly identical saws made at the same factory in Japan.

If you are going to own a table saw you need to educate yourself on how they are adjusted for optimal cutting performance. This posting is about one of the critical adjustments needed. Please watch the videos below, it shows various ways you can check alignment. While it is a 10 inch table saw and the screws that adjust the blade to be parallel to the miter slot are in different locations than the Proxxon saw the concepts of the needed adjustments are identical. The author of the videos was kind enough to send me links to embed on my blog. Many thanks Marc, I have already been getting raves about your bandsaw video that was posted here a couple of days ago.
This spring I purchased a used Proxxon saw on which the blade did not line up parallel to the slot in the table top. The misalignment was severe enough I could not use the saw to accurately cut miniatures. Not every Proxxon saw has this problem, I have another one that is perfectly aligned. This lightly used saw is out of warranty and I am not inclined to send it to a repair shop for a problem I can fix myself so here is what I did to fix my saw. Why was it out of alignment? Not a clue, these things happen sometimes because castings can change shape after machining due to internal stresses or maybe the person who did the job messed it up.

Warning!!! Do not do these adjustments if you have a new table saw or if it is still under warranty. You will void your warranty. Take your saw back to the store or send it in for repair or replacement according to the instructions you were given at time of purchase.

Only attempt this adjustment if you are mechanically inclined and used to working with and repairing things and have the proper tools to do the job. Be very careful because you could break a metal casting or the plastic housing, you can cross thread the screws or ruin the circuit board.

The circuit board must be handled with extreme care. I am using my big table saw's steel top as a work surface. The big table saw is well grounded, I have it plugged in. As I work on removing and replacing the circuit board I touch the steel table saw top to discharge static electricity from my body.

The Proxxon saw must be unplugged at all times during this procedure. It is very easy to drop and loose tiny screws so work in an area where it will be easy to find them if they do get dropped. Keep the screws you remove in small plastic bags and label the bags so you know what part they are used on.

Tools:
You will need two cross tip (phillip) screw drivers, a #1 and a #2. The #2 should have a long thin shaft as you need to get into deep and narrow pockets to get to the screw.
You will need a 7mm metric wrench.
You will need the metric hex (Allen) wrench that installs your table saw blade.
You will also need a drill bit and drill motor, small pointed grinding stone and a rotary tool.

If you have checked with a scale, adjustable square, or dial indicator and found that your saw is out of alignment then you will have an hour or more of work to do to fix the problem.
photo copyright Karin Corbin 2009


My saw was out of parallel by .013" front to back as tested with a shim gauge set between the square and the saw blade. You can purchase shim gauge sets at automotive parts stores or hardware stores.
photo copyright Karin Corbin 2009


The first step is to remove the three #2 screws (yellow circles) and four #1 screws (blue circles) from the bottom of the saw as indicated in the photo. You won't yet be able to remove the shroud as there is still one more #2 screw located inside of the cover over the switch circuitry.
photo copyright Karin Corbin 2009

Very carefully lift the cover off the area over the switch, don't try to detach the wires, just set it to the side. (See photo below) Next pull up gently on the circuit board, it is not held in with any screws, it slip fits into a slot. Again don't try to detach any wire, just gently move it to the side. This is the most dangerous part of the job, you don't want to have to order a replacement switch or circuit board.
photo copyright Karin Corbin 2009


Remove the last screw that holds the plastic shroud on (photo below), the one that is hiding inside the electrical area just next to and below the circuit board. You won't be able to fully remove the cover until you reach between the shroud and the table top and release the catch on the quick release plug to the motor. Mine was white colored. There is a small clip on one side of the plug that will flex out to release the catch.
photo copyright Karin Corbin 2009

Set the shroud aside in a safe place where it won't get damaged.

There are four countersunk screws that hold the motor mounting casting to the table top. Those are where the adjustment to alignment takes place.
photo copyright Karin Corbin 2009


I found that these screw mounting holes were very accurately located and sized, there was no room to make any kind of adjustment from side to side. Great if the saw is aligned, horrid if it is not. I feel the designing engineers over constrained the saw by not allowing room for adjustments. Therefore I took a drill just slightly larger than the hole size already in the part and enlarged the holes so I could get some movement.

To enlarge the holes I had to remove the casting from the table saw.

Remove the four countersunk screws that hold the casting to the table top.

Next remove the two screws with nuts that fix the tilt function to the table. The nut requires a 7mm wrench. There is a small metal clip over that tilt rod. Be careful to note that the clip is bent in a slight V shape and has one clipped corner. You need to be sure you put it back exactly the same way when you reassemble this feature.
photo copyright Karin Corbin 2009

Remove the blade tilt and height raise knob and the angle indicator from the front of the saw casting. First unscrew the height adjuster, then the tilt lock knob, there is a washer under the tilt lock knob, unscrew the angle indicator. Pull the motor assembly out of the casting..
photo copyright Karin Corbin 2009

photo copyright Karin Corbin 2009

Enlarge the four countersunk holes in the casting with a drill press or drill motor. I had my bracket set on a riser block on my drill press and enlarged the holes from the bottom side rather than the countersunk side.
photo copyright Karin Corbin 2009

Now reassemble the casting and tilt mechanism to the table top and put the tilt and blade lift knobs and indicator back on the front plate.

You will need to figure out which direction you need to pivot to line up the blade parallel to the miter slots. Watch that saw setup video and you will see exactly what I am talking about if you don't understand what I just wrote.

When you figure out which direction you are going to swivel you will find just enlarging the holes is not enough. The countersinks will realign the screws back to the original position if you don't make clearance room for the new position of the screw over to one side of the countersink. You can see me doing that with a pointed grinding stone in a Dremel motor in the photo below.
photo copyright Karin Corbin 2009
I wish that rather than countersinks they had counterbored for a flat bottomed recess and used socket cap screws. One of these days I will counterbore or I will put aluminum putty under the countersunk screw heads so they again have full bearing force. For now I have my fix besides I don't have a counterbore to fit so I can't do that just yet.

You might have to go back and forth between the saw top and the underside of the top adjusting screws and checking the alignment with the square. It took me several tries and a little more grinding of the sides of the countersink before I got near perfection. I started with a difference front and back edge of the blade of .013 thousandths and ended up with less than .001 thousandths. Of course my measuring tool, a square against the edge of a slot, is not actually that precise of an indicator but it is good enough to do this job. Perfection is relative, as long as you are getting good parts made it is good enough.

How much will your saw motor need to pivot on those adjustment screws is something you will have to find out for yourself.

Put the shroud back onto the saw carefully aligning the area around the front plate. Put back the screw that is inside the switch box and then carefully fit the circuit board back into the slot. The circuit board is tapered, narrow end goes into the slot first. Now put the cover back on the electrical and the remaining three screws that hold the shroud on. You are done, congrats!

Realizing that at some point in time I might need to make small adjustments to those four screws again I cut an access hole directly over the two screws I could not reach with the shroud in place. I will put a piece of duct tape over it so sawdust won't fall out of it. Now I don't have to take the saw apart again to make this adjustment should the saw get out of alignment.
photo copyright Karin Corbin 2009

July 16, 2009

Bosch Colt custom router table


A few years ago the Bosch tool company came out with a new, small sized, 1/4" router, the Bosch Colt. There is a variable speed model and it is micro height adjustable, a perfect router for dollhouse building. Having read great reviews about it I decided to purchase one. I liked it so much I gave my friend Don one for his birthday. He liked it so much he designed a custom router table for it to do prototyping jobs for his business. Then he gave me one of his custom tables for my birthday. Nice!

This router table is laser cut from Delrin plastic with a backer of Baltic Birch Plywood. The plywood provides additional stiffness, acts as a backer for the removable throat plates and also adds extra length for clamping to a workbench. One of the great features of this custom table is the replaceable custom throat plates. Having those allows me to create zero clearance around any bit that will fit the router. While I don't have it installed in the photos shown I can also use wood strips screwed to the router fence to create a zero clearance fence opening around a router bit. No the photo does not show zero clearance in action, much too big of a gap around the bit, I was in a hurry to snap some shots and did not have time to size a plate for those particular bits. Oh well, I am lazy some days. I took these photos several months ago and don't feel like redoing them.

Zero clearance is very important when working with tiny parts to provide good support for the parts you are cutting. Also it prevents the leading edges of parts from catching on the far side of the fence as you are pushing a piece along the fence.There is also a movable component for the fence that I don't have shown in the photo as it is not yet finished. It is made from wood and will slide open or closed for a tight fit around the bit.

The next item I will make for this router table is a clear dust collection fitting over the bit which will provide safety for fingers while getting the sawdust out of my face.

By using a collet reducing bushing I can use 1/8" shank bits in my 1/4" shank router. You can buy these reducer collets from Stewart MacDonald http://www.stewmac.com/shop/Tools/Routing_bits/Adapter_Collet.html

In the photo below you can see me using my router table with a router bit that has a bearing on the top of it. These are sometimes called pattern following bits. This allows me to follow a template accurately. That is a window opening being cut into an Acorn Cottage wall. The template window opening was made with a scroll saw. After the template is double back taped to your wall you drill a starter hole for the router bit in the area of the window opening. Once the window opening is cut I can quickly square up the two lower corners with my flush cutting razor saw. Routers can't cut square inside corners.

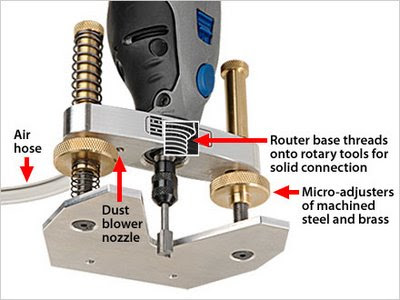
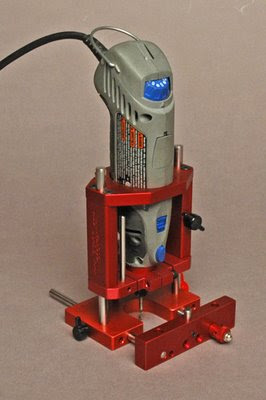
Precision router bases for Dremels


Stewart MacDonald router base for Dremel


Bishop Cochran router base for Dremel

Yes there really is a precision, micro adjustable router base around for a Dremel Motor Tool, in fact there are a couple of them. You won't find them in stores selling dollhouse tools or model making tools. You won't find them on the Dremel website either. These specialty bases were developed for building guitars where a lot of precise routing needs to be done. Just because they were made for guitars there is no reason you can't use them for building dollhouses.

One maker is Stewart MacDonald
http://www.stewmac.com/shop/Tools/Special_tools_for:_Routing/Precision_Router_Base.html

Here is a video of that tool in action from youtube.


Another maker of router bases for Dremels and Foredom Motors is Bishop Cochran
http://www.bishopcochran.com/

I purchased the Stewart MacDonald as it is my plan to build a custom router table using his base to precisely control the height of the bit I chuck into my motor. The thin sub base on his router can be removed and then I will mount it under my custom table top that will have interchangeable zero clearance throat plates. The custom table top and throat plates will be cut on a laser and the material I will be using is Delrin. It will be similar to my custom table for the Bosch Colt Router.

July 15, 2009

Dremel 580 Table Saw


I love woodworking tools, especially those used for making miniatures. The Dremel tablesaw was for many years the only realistic option available for making dollhouse items and for ship modeling and model railroad work. While there are now other saws around such as the Proxxon, Microlux and Byrnes table saws these older Dremel Tablesaws are still useful and are the more affordable option. There is no manual around for maintaining them, tuning them up, alignment and such so I have undertaken to help with showing everyone how to do it on my blog. I am currently downsizing my workshop so I have a couple of these saws for sale. Contact me by email by sending to karincorbin at gmail.

On the saw shown here I only needed to do some relatively minor work  to put it back into prime operating condition. Over the years I have had opportunity to have purchased or been gifted several of the Dremel 580 table saws as well as the same saw with a Sears Craftsman label on it. This is one of those saws, it was basically unused because the belt kept slipping off the pulley.

The top surface look slightly scuffed but still in good shape. I turned on the saw and the motor sounded just fine, really fine in fact. Unplugged it and flipped the saw over so I could get a good look inside. Oh now that is strange was my first thought, what in the world is a C-clamp doing in there. Then within seconds my brain clicked out the answer, the belt was slipping. That is a very common problem with the Dremel Table Saw and frustrates many people. However it is a fairly easy fix....if you know how. So I am showing you how in this posting.


Now another thing I noticed is a bunch of rust on some of the metal. Don't get upset about it if you see that on a used saw because I have rarely seen a Dremel Saw that did not have it. They did not coat those particular parts with a decent protective finish. This is also a fairly easy fix. After you take care of the rust remember that it will occur again if you don't do some routine preventative maintenance on your saw.

The truly great thing I noticed about this particular Dremel Table Saw is that it has never cut so much as one inch of wood or anything else. There was not one speck of sawdust in the dust shoot or under the saw, only a few some cobwebs. It belonged to the aunt of the guy who sold it to me. She must have turned it on, had the belt slip then tried the C-clamp fix which of course did not work. I knew it was a keeper, a 20+ year old virgin Dremel table saw. Believe it or not I found another one of these virgins a few months ago and it was still in the box.

I sprayed the rust with "Rust Free" a product from Boeshield. This product is phosphoric acid, you can get similar products at auto parts stores. I let it sit for a minute or two then scrubbed with a soft brass bristle brush that is the size of a toothbrush. Cleaned off the part and let it dry. Phosporic acid converts rust, not sure what it converts it to but those little remaining spots where rust used to live are now black colored and have a protective coating on them.  After I cleaned up all those rust prone parts I coated them with another Boeshield product, T-9. That stuff is so much better than WD-40 it is not even in the same class. It will protect the parts for a long time. I also used it to treat the threaded shaft that raises and lowers the blade as it was not turning as freely as I would have liked. Just a couple of squirts and that problem went away too. A dry lubricant stick is also good to rub onto the threads. Lubricating the screw shaft should be part of your maintenance routine.


Fixing the belt that was slipping sideways proved to be a little more trouble. There is a set screw in each of the two pulleys. On this particular saw screws were so firmly screwed in I could not back the screw out by hand with a screw driver. Whatever you do don't strip those slotted screw slots trying to get them out. I took out my battery operated Makita impact screw driver. I love that driver, it fits my female sized hands and is so fine tuned that it will do delicate work but the impact ability also means it can break loose a frozen screw without stripping it.  When removing this set screw be sure to use your hand to firmly support the pulley from behind, you don't want to bend any shafts or put stress on the main castings of the table saw.


To adjust the tension on the belt you need to loosen the two screws that hold the motor to the table saw with an 1/8" allen wrench. You can see me doing this in the photo. If you go to www.micromark.com and type in Dremel table saw belt you will replacement belts you can order plus they provide a pdf file discussing replacing the belt and tensioning the belt. If adjusting the pulleys has not solved the problem you can try very slightly skewing the motor on the two mounting screws. You don't want to do an extreme side to side tilt as it is important the pulleys be aligned. A very minor tweak might do the trick, but only as a last resort if moving the pulleys in and out on the shaft did not fix the problem of belt alignment and slipping. There is one more method of getting the belt aligned if this method failed so keep on reading a bit further as I am showing it a little further down after this next photo.


 When all the other attempts to get the belt from moving sideways towards the outside edge of the pulley has failed it is time to try putting in a shim. I have had a couple of Dremel Saws where for some reason there does not seem to be a true parallel between the shaft in the motor and the shaft that holds the saw blade. By putting a very thin shim between the pulley end of the motor mount bracket and the saw motor I have been able to correct the issue. In this photo I have used scissors to cut a piece of .002 inch thick piece of soft sheet brass and punched a hole in it to clear the screw. To punch the hole I used my notebook paper hole punch. So no exotic tools needed for this task. Thin brass is available at hardware stores and also in craft stores. I stuck the shim in place with a piece of double sided tape, the thin stuff, clear stuff used for gift wrapping will do the trick. It is just to keep it from shifting on you while you put the screw back in and then tension the motor. Now my belt tracks true and stays right in the center. These two photos showing the shimming are from a different Dremel Saw than the one shown above. In this case I had just installed a brand new motor.

Next up...what I use to clean and lubricate the saws. This is part of a kit I keep in a tote for workshop maintenance task on my tools. You might also need one of the oil based rust loosen liquids to free up rusted screw threads.


This is my chemical arsenal, left to right
Boeshield T-9, lubricates and prevents rust
Boeshield Rust Free, helps loosen rust and coverts it to get rid of it
Boeshield Blade and Bit, removes loose rust, gummy old oil, caked sawdust, resins from saw blades, screw threads & machine parts
Bostik Dri-Cote, I spray this on saw blade and router bits to help prevent resin buildup and burning, makes cutting easier
Bostik Top-Coat, I spray the tops of my table saw, band saw, drill press, planer and other metal tools with this product. It keeps them cleaner, prevents stuff from sticking to the tops and makes everything slide freely across the surface. No Silicone in it and it won't mess up finishes on wood.
Bostik Bearing Lubricant, I use this on the bearing in router bits and on machine parts that need to slide or move freely.


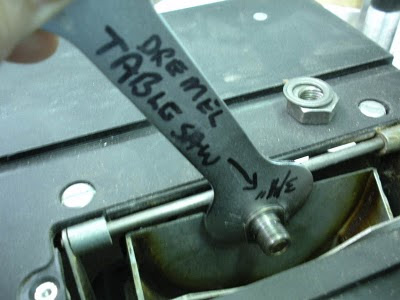
Another problem that happens when you find a used Dremel tablesaw is that the very thin wrench that goes against the inside of the blade to hold the shaft still while you tighten on the nut  has gone missing.  The original tool for this task was  made from a bent over piece of sheet metal with 3/4" notch in it. Seen below as illustrated in the manual.
If  you are lucky you might have a thin, stamped steel 3/4" open box wrench in your tool box. If not while they are difficult to find you can modify an easy to find thin bicycle wrench into something that works.  I used a very thin 17mm stamped steel bicycle wrench. A metal file was used to enlarge the 17mm opening to 3/4". It works great sliding easily into that narrow area between the blade and the saw housing.  You can see that I have clearly marked my reworked wrench as being for the Dremel Saw so it will not end up in the junk box or the garbage can.

Having trouble raising and lowering the blade? This next section is all about how to fix that issue.
There are several things or a combination of things that can create this situation. First photo below is just an overall view of underneath the saw to get you oriented for the rest of the photos.

So first lets talk about one issue and that is where you turn the adjustment knob on the front of the saw and nothing happens, the knob goes round and round and the blade does not move up and down. In the photo below take a look at the small tabs the red arrow is pointing to. They are meant to locate on the flat surfaces of the metal cylinder that houses the screw adjustment. If someone has tried to force raise the blade when the height adjustment is binding up on the screw they can spring open that detent area a little and with will spin around and end up on the curved surface of the cylinder instead of remaining in the proper location. To fix the problem turn the shaft so they are on the flat and using a flat bladed screw driver gently tap them back against the shaft so they grip once more.

In the photo above where the yellow arrow is pointing you can see how much dirt can get stuck in the adjustment screw over time. That needs to be cleaned off as part of your regular saw maintenance. Be sure to lubricate the threads with the Boeshield T-9. Don't use sticky grease for lubrication, it will trap the dirt on the screw and it will travel up into the cylinder get packed into it and cause binding. If your old saw has that condition you will need to spend a lot of time running the screw back and forth cleaning off the dirt it brings out of the cylinder. Eventually you will get it cleaned up. A soft brass wire brush can be used to remove excess rust from the screw. PB Blaster is also a good chemical product to loosen rust, but remove the belt before you apply a spray chemical. (You don't want the belt to absorb a lubricant as it could lead to belt slippage.) If you need to you can use a fine steel pick or even a toothpick  in between the threads to remove stuck particles the brush does not take off.

I was recently asked if you can unscrew the black plastic knob on the front and take it off. I don't believe you can, I am pretty sure it was a press fit installation. There would be a real risk of damaging the plastic saw's housing if you tried to pry it off of the shaft. You can remove the metal saw housing by taking out the two screws that come in from the top surface and the screws that hold that metal housing to the plastic saw body. Then once the housing is loose start turning the black knob until the screw that raises and lowers the saw blade backs out of the shaft the knob is attached to. But you would not need to do that unless you really needed to do a major rust removal job on those screw threads and also chase the threads inside the shaft. Pretty much a last resort fix for the blade raising screw to get it freed of rust and working smoothly.

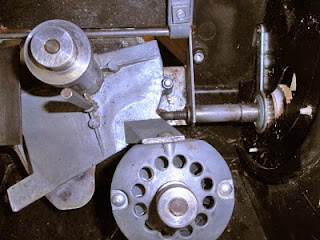
The final condition that can cause binding while raising the saw blade is found towards the back of the saw, see photo below. There is a cover plate with a curved slot. There is a bolt that goes through the slot. Dremel Tablesaws have metal that is prone to rust. Most people store their saws out in unheated garages and rust builds up on the inside surface of that cover where and binds up the movement when the saw blade is raised or lowered. Remove the bolt at the rear of the cover (see yellow arrow). Next loosen the bolt  that is towards the front of the saw. Take a long piece of emery cloth and some rust removing oil and do your best to pull back and forth on the strip, scouring off that rust that is on the inside surface of the cover plate. Put some T-9 on that cleaned surface to lubricate and prevent more rust from forming. Put the bolt back and tighten the front and rear bolts. Tighten  to barely snug then back the nut off very slightly as the parts must move freely and not bind.
 
 ____________________________________________________________________________
____________________________________________________________________________


It is important on any table saw that the blade is positioned parallel to the miter slots. See the photo below. There are two screws on this saw (see yellow arrows) used to make that adjustment. Unplug your saw before you begin. Back the screws out leaving one of them barely tight to uses as a pivot point but the other one looser. I use a ruler with fine calibration marks. It is best to choose one saw tooth to measure from. Mark it with tape or paint so you don't get confused.  Put the tooth at the front of the saw and measure from the edge of the slot over to it, then rotate that tooth to the rear of the saw and measure from the edge of the slot over to it. The measurement should be the same. After you have made this adjustment and go on to adjust the fence remember that the distance between the saw blade and the fence must NEVER be smaller at the back edge of the saw blade than at the front or you will create a pinch point and get kickback where a board can come shooting out of the saw right back into your stomach.

Last but not least, replacement motors. I know of only one source for an authentic replacement motor. This company purchased the remaining stock of them. They are not inexpensive however they are the real thing, it is the OEM motor from the Emerson Motor Co. that your Dremel tablesaw came with when it was new. I do not recommend using an under powered sewing machine motor or the ones such as the one from Grainger that you will see posted elsewhere on the internet by people saying it is a proper replacement motor, it is not! The motor from Grainger is not a good substitute. Contact the company below, sometimes they list them on EBAY and they are shown in their company catalog. SH Goode and Sons also sells quality hardwood lumber such as Cherry cut to scale thickness sizes for making miniatures.
S.H. Goode & Sons Workshop
Steve & MaryAnna Goode
PO Box 2575
Atascadero, CA 93423
Voice: (805) 460-9663
Fax: (805) 460-0424
July 11, 2009

8 Sided Roof Tutorial


This is a long posting today, I am showing how to use a table saw with a miter gauge to cut a multi sided roof for a miniature structure. The roof you will see me cutting has 8 sides and a 55 degree pitch. It will have a cupola coming up through the center, therefore you will not see a point on the roof panels. This same cutting method will produce roofs with 3, 4, 5, 6, 8, 10, 12 any number as long as it is more than 2.

Please note that I have the safety blade cover removed from the saw, always follow the safety recommendations from you saw's manufacturer.

I figured out what the angles on the roof panels would be from my design in a CAD program. There are charts for determining these angles on the internet with the most common multi sided numbers and angles of slope given as well as online calculators and formulas to use with scientific calculators.  Click here to see  my favorite online calculator for finding the settings for saw blade bevel angle and the associated miter gauge angles that go with a particular roof pitch.

The first cutting task will be to cut a long plywood strip(s). the width of that strip is equal to the distance from the bottom edge of the roof to the top edge perpendicular to the bottom edge. You can bevel the top and bottom edges at this time but those bevels must be parallel to each other as you will be doing a flip cut technique. The length of the strip is figured out by sketching a layout of the panels. Along your layout sketch strip one roof triangle will face point up, the next point down. There is a small waste triangle at the start of the cuts and also saw blade thickness between the cuts. I usually allow for a few extra panels just in case I goof. OK your basic material strip is cut now lets get to the trickier stuff.


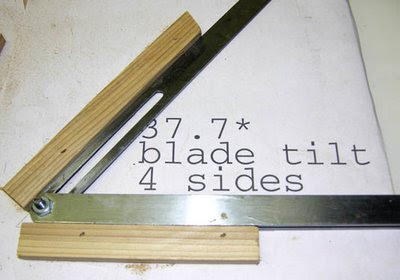
With the blade upright at 90 degrees as high up as it will go I set the miter fence to my needed angle. I made an angle template using acrylic on the laser cutter specifically for this job but you can also use an adjustable bevel gauge instead of an angle template. If you want to use the bevel then use a graphics program or CAD program to draw out the specific angle and print it onto paper. Use a light coat of spray adhesive to  stick that pattern onto a flat piece of wood. Next tack wood strips to each side of the angle being very accurate about getting it right against the lines of the angle. Do leave as shown in the photo below a small gap at the apex of the angle to facilitate the use of the bevel gauge.  Now the bevel gauge  between, open it against the wood strips and then lock it to that angle.  You must have a template or bevel gauge short enough or else thin enough to fit between gaps on the saw blade teeth so that  it does not touch any of the teeth on the blade. It should rest only on the solid body of the saw blade, never on top of a tooth. (This angle setting method will not work on a hollow ground saw blade as it does not have a flat surface.)


The next step is to tilt the saw blade over to the angle you need. You must have a bevel gauge or angle template thin enough that to slip fit into the space between the saw teeth so it can rest against the body of the saw blade. I shine a small flashlight from behind my gauge and if any light comes through I adjust the blade tilt until the angle is a snug fit.


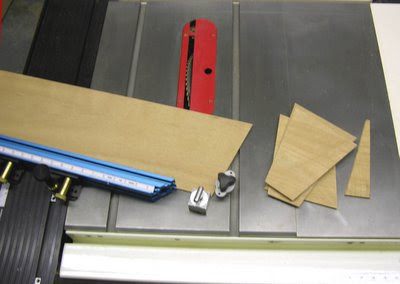
Place your long plywood strip against the miter fence and make a cut that takes off that square end and leaves you a lovely angled, beveled edge. In the photo above you can see that waste piece, the skinny triangular cutoff piece to the far right side. Note before you cut anything that if you have beveled  the top and bottom edges you will first need to figure out how the first panel needs to be positioned so those edges are oriented on the roof panel as you want them to be. Now rotate the board 180 towards yourself so the side that was against the table now faces up towards you. From this time it will be rotate cut, rotate cut until you have enough sections for the roof.


At this time you need to set a couple of stop blocks to control the width of your panel. You will see in the photo above that I have used as stops two magnetic blocks made just for table saw setups. Regular magnets would not be strong enough however you can firmly double back tape wood strips to you table saw top to act as stops. You won't be putting a lot of pressure against them, just gently moving your plywood strip over to them. A stop block of some type is absolutely essential so your panels are always the same width. You will need the blocks to be positioned far forward enough on the table so the plywood panel is clear of the blade when you begin the cut. The block along the side should be fairly short in length, an inch or two is enough.


Postition the panel against the blocks, turn on the saw, hold the panel in position against the miter fence while pushing the miter handle forward, cutting through the panel and moving it on past the blade. Then I turn off the saw, let it come to a stop and remove the newly cut roof panel section out of the way of the next cut. Move the miter back to the position forward of the saw blade, flip the plywood, set the material against the stop blocks and the miter fence, turn on the saw and cut again. Only 8 times and you are done! It does not take long to cut the panels, most of the time is in the setup.

The following photos show how to assemble the panels. I use a quality duct tape from 3M that leaves no residue behind when you remove it. I normally buy it at Lowes or my local hardware store but here is an online source for it.  http://www.amazon.com/Scotch-Tough-Residue-1-88-Inch-20-Yard/dp/B0014LQK58 That duct tape is my only clamp.  I use the body of the bird or doll house to conform the perimeter angles of the roof while the glue dries.


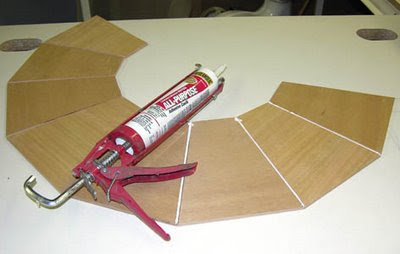
First I lay the panels side by side with the angled bevel facing down then I tape the joints.


Next I pull it up into the shape and tape the last joint. I always do a check fit before I glue them together. Would you look at those joints in the photo above, NO GAPS, PERFECT miter joints! That is the beauty of my cutting method, it really does work.


Now take the tape off one joint and put the taped side against the table. Fill the joints with glue but don't get too heavy handed or you will have a big mess to clean up. The adhesive I am using is from Locktite and it is called Polyseam Seal, it is labeled clear, extra adhesive and it has a lifetime warranty. This is an acrylic caulking product I purchase at a hardware stores or at Home Depot or Lowes. This is my primary glue for birdhouse and dollhouse shell building, it has never let me down. When building a birdhouse I make sure every cut edge of the plywood on the birdhouse is completely covered with glue, this prevents any water getting up into the plys and possibly causing dry rot. I am using water resistant plywood, the flat surfaces are very good but those cut edges are the most vulnerable area for water infiltration soaking into the material.


Now pull the last two edges back together, tape that joint and place the roof on the house structure to dry. Put some waxed paper under those corner so you don't glue it to the house just yet as you will want to do more work on the roof such as painting the underside, installing edge trim or even gutters. Because this is a birdhouse I will put an exterior rated gray primer on the plywood before I shingle it. The shingles will weather to gray and any cracks that may develop won't show with the matching primer under there. I have never lost a shingle on a birdhouse, even ones that have been outside for over 15 years. For birdhouses I make thick shingles, thin dollhouse shingles won't hold up for long.

OK now you know how I make my roofs so go forth and build octagon houses, gazebos and towers.

Leveling throat plates on a saw


When making scale models, engineering models, birdhouses or dollhouses I want precision cuts to a particular size that have accurate angles on the sides of the cuts. It can take a lot of fussing and a lot of patience to make that happen. Many of the cuts I make are done on a 10 inch table saw, I want that saw and my small table saws fine tuned so that what I get is accurate to the dimensions I am trying to achieve. It all starts with a good table saw tune-up but that is not the subject of this blog.

To get an accurate cut it is essential that the throat plate be dead level to the top of the table saw. If your throat plate is too high then the edge of the wood sitting on it will slope down towards the fence and your intended 90 degree cut will end up being made at an angle. If the throat plate is too low you might get sloped cuts on short pieces or the wood might hang up on the back edge of the plate opening and mess up your nice cut. If you are trying to accurately cut a groove of a particular depth it too might turn into a mess.

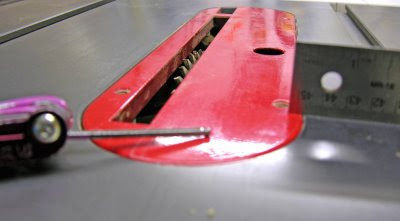
Every saw is a little different, the one I am working on today has small tabs extending into the opening for the throat plate. There are hex head screws in the throat plate that rest on those tabs. I fiddle and fuss and fuss some more back and forth between the screws until I get it just right. To check if it is level I use a steel rule or some other object that has a long straight edge and sharp corners. If the corner hits onto the edge of the plate or the table top I know the plate is not perfectly level so I tweak the height a little more until I feel nothing hitting. Every time I change the throat plate I have to be sure there is no sawdust on the adjusting screws or on the support tabs. Just that little bit of debris will mess up the level. I always grab a straight edge and check when I change plates or if I have been cutting for a long time as vibration from the table saw can move those screws.

Some table saws including miniature saws don't have adjusting screws. If there are no ajusting screws you will need to resort to using shims of metal, paper, plastic, cellophane tape, whatever you can find that works is OK to use. If your throat plate is too high to begin with you will have to make new ones or reduce the thickness where it rest on the edges of the opening. Making your own throat plates is a good thing to learn. I will cover that in another post sometime later.

A lot of the throat plates for miniatures saws are warped to begin with. You might have to back them up with another layer of material to stiffen them. Of course you don't want that layer to touch onto the recessed ledge the plate rest on and it can't be so thick that the saw arbor hits on it and bends the plate upwards.

Want a dead flat plate on a 4 inch table saw that needs no fussing? Then buy a 4 inch table saw from Byrnes Model Machines, he has taken the time to match the recess in the table top to the thickness of the throat plate. There is a link to Jim Byrnes in my file of links on this blog.