Showing posts with label tools. Show all posts

July 13, 2012

Dollhouse Dormer Part 3

Cutting dormers for the Elizabethan birdhouse part 3.

Today I am cutting the window openings in the dormers using a miniature table saw with a 3 and3/8" diameter blade. 

First thing to do is draw lines right onto your tablesaw top. Use a felt tip marker and  a straight edge draw a put a line across the top that is the same width of the saw blade that runs parallel with the blade. Then draw a line perpendicular to that line to indicates the center of the saw blade's arbor hole.
photo copyright Karin Corbin 2012

That intersection of those two lines is the center point of where your blade will come through when you raise it up through your panel.

The first two sides of the window openings, top and bottom, were done using the table saw fence against the bottom edge of the dormer. The top point of the dormer lines up with the line indicating center of the arbor.

The last two cuts are created by placing the bottom edge of the dormer against the miter fence and using those lines on the table top as my reference point I line up the dormer to center the blade on my cutting line.
photo copyright Karin Corbin 2012

Because my window is centered on the peak of the dormer I have used double back tape to stick to temporary plywood fences to the top of my table saw (those are the light colored wood). Now I can just flip the dormer piece  over after making the first cut to make the second cut without recalibrating my position.  Note in the photo that I have clamped the dormer to the table saw top to make these cuts. When it is possible to use clamps I always take the time to do so instead of risking my fingers.

Cutting dormers part 1
Cutting dormers part 2

June 20, 2012

power strop to go

photo copyright Karin Corbin 2012

 More work done today on my new carving stand including a way to power hone my tools for those scary sharp edges that cut wood as if it were butter.


My carving stand was built using a "hide-a-horse", lightweight (7lbs) folding saw horse. I love it, it sets up in seconds but folds up into a very small package easy to store under a bed or in a closet.
Watch the video on this link to see how it works http://hideahorsefoldingsawhorses.com/

 A proper tool stand was made to fit. It is screwed to the base plate, not to the saw horse. The screws allow me to take this carving stand apart and flat pack it. If I wanted to I could then  put the pieces of the stand (minus the saw horse) into a suitcase and fly away with it.  I put T-nuts into the back side of the plywood to hold the vise and used plastic knob screws to go into the T-nuts. That make it fast to take apart but still strong. I have put cork sheeting on the underside so the tool stand so it can be used on its own on a table or desk.

I put a layer of thin adhesive backed cork sheeting over the magnetic, stainless steel knife bar. I purchased the bar from my local Ikea store but they can also be found on Amazon or Ebay.  The length of the bar is what determined the size of my carving stand. I like the stand to be that long because it keeps the C clamps that attach the stand to the sawhorse, desk or table top from hitting my knees. Also it gives me lots of room for hanging up carving tools. The cork sheeting is shelf liner from the Contact brand. You can find it in hardware, home center stores and places such as Walmart.
photo copyright Karin Corbin 2012

Another chore today was mounting a honing disk onto a mandrel so I could use it in my battery powered drill motor. This kind of mandrel can be found in hardware stores. The honing wheel is made by gluing layers of mat board together.  Be sure to carefully cut the circles so you don't have to do a lot of sanding to true up the disk surface after the glue is dry. Use the motor turning against a sanding block. But to get that chore done even faster turn it with the drill motor against a running power sander.
Add captionphoto copyright Karin Corbin 2012
 The green color on the wheel is honing compound. The wheel does not need to be charged with compound very often, it last a good long while.


June 5, 2012

Cutting Dormers: part 1

photo copyright Karin Corbin 2012
Cutting dormers for the Elizabethan birdhouse part 1

I still remember the days when I did not know how to approach making things like dormers for a miniature building. Lack of knowledge and often a lack of tools is where we all begin. This being a teaching blog I will show you how I am cutting the pieces for the front of a dormer that has a steep roof pitch. There are a number of methods to make these cuts and I don't always make them this way.

The miter angle fixtures that come with table saws won't rotate past 45 degrees but for this house I have to cut a sharper angle than 45. The method I chose  is to make a single runner miter sled for my 10 inch table saw. I have a number of pieces to make using this particular angle so the jig will be useful for insuring all the parts get cut to that same exact angle without variation.
photo copyright Karin Corbin 2012

The runner that goes in the table slot could be made of hardwood or if it is only going to be used a few times pine or basswood will also do the trick.  I am using a metal slide since I have one that I can unscrew and use it again and again for other jigs if I wish. As you will see I am using materials out of my scrap bin for the sled base and for the fence as well. Actually the plywood came out of a neighbor's scrap bin, I am not too proud to use his leftovers!
photo copyright Karin Corbin 2012

As I am cutting this roof at a 60 degree angle I am using a  drafting triangle with a matching angle to accurately establish the angle. I place the edge of the triangle right against the saw blade being sure it is not resting on any of the saw teeth, sneaking it between them, touching only on the flat of the saw blade. I have attached the fence to the base with double back carpet tape, it is plenty strong enough to hold it in place without shifting. I am using double back tape because I am going to reposition that fence to a couple of other angles for other dormers and gables and dormer roofs before I am done with all the cutting on this structure.

This first dormer front wall I am cutting has some vertical sides on it. Other dormers and gables I will cut are simply triangles with no vertical sides on them. I am showing those in other postings.

photo copyright Karin Corbin 2012

First the dormer plywood material is cut to width. Then I mark out how tall the vertical sides are. I make sure the mark at the point where the roof pitch starts gets transferred on down the edge of the plywood. That mark is going to be aligned with the cut edge of my miter jig. See photo above, it will enlarge if you click on it. This is a quick, simple and accurate method of aligning the starting point of the cut for the sloped roof line on the dormer.

photo copyright Karin Corbin 2012

The first cut goes just past the point of the peak.
photo copyright Karin Corbin 2012

Then the board is flipped, aligned to the mark and the second cut is made.

photo copyright Karin Corbin 2012

Notice how my board is left longer than the length of the small dormer, it gives me good registration against the fence. I will cut the second dormer piece I need from the other end of the board. That butterfly shaped piece left in the middle will still be there for a nice long registration against the fence.

That center waste piece has complimentary angles that will soon be recycled into making yet another miter sled jig for cutting the timber frame trim pieces that will go onto this dormer and on the gable ends of the house. Be sure to watch for opportunities like this because they give you those exact matches on angle cuts that will fit perfectly onto your house parts. I will show you the jig I make from it later on in this blog.

If I was making a dormer with equal side lengths I could have used a stop block on the fence for the second cut. But these dormers are on each side of another third dormer that sits between them and the peak is not centered across the width of the dormer.  You can see the dormers I just cut on the CAD model in the image below. They are on the left and right of the center dormer. Elizabethan birdhouse image below.
photo and design copyright Karin Corbin 2012
Link to Cutting Dormers: Part 2
Link to Cutting dormers: Part 3

April 12, 2012

make a stropping wheel

photo copyright Karin Corbin 2012
Over the last couple of days I built a homemade stropping wheel for sharpening my carving tools. It makes them incredibly sharp, even the very tiny 1mm and .5mm gouges can be sharpened to a razor sharp edge with this wheel. There is no risk of overheating or burning the small tools. It will remove any minor nicks as well. A local carving teacher told me how to make this wheel.

The cost is low and the materials are easy to come by. The material the wheel is made from is mat board. Yes, it is the mat board you find at art supply stores and framing shops. You adhere layers of it together with a PVA glue such as Elmers. Be sure you cut accurate circles so you don't have to spend a lot of time shaping it into a true circular surface after you mount it to a motor. I did the final shaping of my wheel with a coarse grit sanding block while the motor was spinning the wheel. The sanding to a true circle creates a lot of fine dust so I used a vacuum cleaner nozzle right next to my sanding area to collect the dust. Don't forget to wear a dust mask! After the wheel is trued you can put honing compound on it.

I used 8 layers of double thick mat board in this wheel. I put weights on the stack of mat board disk while the glue set to prevent voids in the layers. Getting voids is a defect that will spoil the effectiveness of the wheel.

I have glued my new stropping wheel onto a plywood disk screwed to a faceplate so I could spin it with my lathe. It is very important to look at the photo above to see how the wheel should be turning in relationship to the tools you are sharpening. I am standing on the backside of my lathe while I am sharpening my carving tools to get the correct spin direction.

What a difference using this wheel is making in my work. I can't get my carving tools this sharp with hand stropping on leather. The tools now glide through the cuts with little effort or pressure leaving a nicely polished surface. I hear that lovely ssssstt noise as the tools cut. The noise that only happens when you have razor sharp cutting edges with polished bevels.

December 7, 2011

Visit from Santa...

Some women love getting new jewelry for Christmas, I love getting new tools.
photo courtesy of Fast Cap, see link below to purchase this item


My new stocking stuffer tool I just got for Christmas from my friend Don is a little square that has magnets in the base. It is very nice for squaring up tools with steel tops such as the band saw, scroll saw, drill press table etc. But it is also a wonderful jig for squaring up miniature projects. You know those metal boards you use with magnets for assembling things? Yes, it will work great on those for holding tall pieces in upright positions. How cool is that? The measurements are in inches on one side and metrics on the other.
It is marketed by Fast Cap
http://www.fastcap.com/estore/pc/viewPrd.asp?idproduct=9935

Rockler sells them too.
http://www.rockler.com/product.cfm?page=22118&filter=magnetic%20micro%20square

April 20, 2011

Final Cut


photo copyright Karin Corbin 2011

The last pair of new scissors I purchased this week also have a micro serrated blade that helps capture the fine fiber so it is easier to trim it off. They are very sharp. I purchased them at a store that sells stamps for crafters. Micromark also carries this little scissors. I think I will try and order a curved blade version of these to add to my collection. They are not expensive, under $12.00 a pair. They are a great tool for that final little trim. Now that I have taken a photo I can see that wee bit more of trimming that needs to be done.

I hereby give myself a certificate in micro scale thatching competence! What a relief to get all that stuff sorted out. But the work is only part way done as now I have to photograph and write the tutorials for the thatching kits.

That is a common sewing pin in the photo next to the penny. Scale is such a funny thing, in the photo the pin looks more like a nail.

August 18, 2010

Making the pintles

photo copyright Karin Corbin 2010

A quick hinge preview for you. I won't install the hinges until after the shutters are painted. I have drilled the nail holes into the straps. The wire nails I will fabricate will go all the way through the shutter and then be bent over and clinched on the opposite side of the wood.

I have used a patina product called "Instant Rust" from Modern Options on the hinges. It is real rust but just a light surface coating. I have not used this product before, I am pleased with it. I purchased it in my local hardware store, it is part of a line of decorator products.

photo copyright Karin Corbin 2010

The pintles I am using to hang the shutters are very simple to make. I have used annealed steel wire. Make a simple 90 degree L shaped bend and then cut to length. Don't forget to dress off the end of the wire so it is smooth with no sharp edges left from being cut by the pliers. The other end that goes into the wall can be pointed. That is what the cup shaped grinding stone in the Dremel motor is for, dressing smooth the end you don't want to be sharp.

August 17, 2010

Dollhouses come in cans?


I have started fabricating the shutter hinges. They will be strap hinges with a pintle support that comes out of the wall of the house. A very basic type of hinge that is not difficult to make.

Research told me a thickness of 3/16 of an inch was used for some real hinges of this type. That meant I needed metal of approx .01 inches to create a 1:12 scale part. Digging into the drawers of metals I have on hand I found a tinned can that was a good match. As I wanted steel for the hinges that also meant it was a good choice. There was a strip of metal wound around the key used to open the can. That is what I am working with.

The tin and plastic coating on the can must be burned off with a torch. This is a job to do outside as the fumes are not good for you. You can anneal the metal at the same time as you burn off the tin. I have given my metal a hammered finish so I had to again anneal the area I was going to form into the hinge barrel as the hammering work hardened the metal.


I am forming the end of the strap around a piece of music wire that I am holding in a vise. Music wire is very stiff and strong so it makes a good forming rod. Tonight's new discovery was that my pair of nylon tipped pliers I purchased at a bead store make easy work of the forming. I can grab onto the metal and hold it against the music wire without damaging the metals. The nylon is soft enough to gain a grip onto the hinge strap so I can pull the strap around to form that tight circle. The top surface of the vise acts as an alignment guide so I get a barrel that is at the correct square angle instead of being crooked in alignment. Of course my forming pin must be clamped at exactly 90 degrees to the top of the vise for this simple trick to work. Or if your don't own a vise you can drill a perfectly perpendicular hole the same diameter as the music wire in a piece of hardwood as use that as your forming tool jig.

Now that I have the hinge barrel formed tomorrow I can cut the strap to length, drill holes in it and even do some decorative shaping of the strap if I wish to do so.

March 13, 2010

Bench Hook


Have you ever needed a little portable workbench you can use on the dining room table or counter top? Have you ever tried to saw something too big for a razor saw miter box and had it slide all over the place? If so then make yourself a "bench hook". Bench hooks have been around for eons, they are an ancient, simple and very useful jig. They are called hooks because they have a cleat that hooks over the front edge of a work bench or table or counter top.

There is certainly not much involved in making one of these. You will need a flat board and nice straight wood to make the cleats. One cleat is on top at the rear of the top, the other goes underneath the front edge. Be sure to keep the top cleat shorter than the length of the board you glue it to so the saw can clear the cleat. I have left room on both the left and right side of the cleat. Cleat boards are easy to make from 1" x 2" lumber. I have used a leftover piece of Baltic Birch plywood for my base since it was lying around unused. I make sure my top cleat has a truly square 90 degree cut on the ends so they can be used a guides for a flush razor saw that has no tooth set. That type of saw won't cut into the cleat that is guiding it. You could make the other end of the upper cleat a 45 degree angle for a miter cutting guide.

photo copyright Karin Corbin 2010

I have spray glued some rubber drawer liner to the bottom side of mine. That will protect the table top or counter top I use it on from scratches. It will help the bench hook grip to the surface I am using it on which will make working with it easier.

Look Mom no clamps to screw and unscrew! Need to stop to make and eat dinner and your project is in the way? It is easy to pick up the board with the project still on it and set it aside until you can get back to work.

How they work is simple, if you are using a saw that cuts on the stroke that pushes away from your body or using other tools that you push away from you such as chisels then the force of the tool keeps the bench hook in position. Of course you are not limited to just those tasks, you can use them for cutting boards with knives or for light duty hammering tasks. Make one with a Formica (laminate) covering on the top, wax the Formica and you can glue or paint projects on top of  your bench hook.

photo copyright Karin Corbin 2010

In the photo above I have placed a board I am going to cut against the rear cleat lining up the cut mark with the end of the cleat. Next I clamped a piece of plywood in place that lines up with the edge of the rear cleat. That clamped wood will do two things for me, first it keeps the wood I am cutting from shifting around so much, second it gives me a square edge to guide my razor saw against. I did not care that my scrap plywood had a hole in it or that it looks ugly, what matters is that there is an accurate 90 edge to guide my saw against.

See the bucket in the photo below? Just think of all the potential jigs for making miniatures that are hiding in there! With a few buckets of leftover wood, some glue, brads and a few screws you can create so much for so little money. There was that scrap of plywood with a hole in it sitting right on top.
photo copyright Karin Corbin 2010

February 19, 2010

Cutting soapstone tiles


I am back to working on the fireplace. It has a lot of soapstone elements to it. For the apron of the fireplace I needed a few tiles that will be inset into the flooring. Like any fireplace hot wood cinders can come flying out and one needs a fireproof apron in front of the fireplace.


Making the stone tiles involved a number of steps. First I had to thickness the stone. I had previously cut some stone slabs on the band saw. I then made a smooth surface on the slabs with a drill press into which I mounted a diamond coated burr with a flat bottom. That milled off all the bandsaw marks on both sides and gave me a flat piece of stone to work with. Then I made the side edges square, the first long side was sanded smooth, the second side ripped square on the table saw and then it was rotated and I used the tablesaw on that first sanded side. I did not care that the narrow ends of my slab were irregular although I could have used the crosscut miter to square them off. I am stingy with my stone and keep the leftover pieces as large as possible for future use.


Now comes ripping it into thin strips. Relatively thin, too thin and the stone breaks apart. I will rout out some of the wood flooring to inset these stones and hide some of that extra thickness in the final installation.
photo copyright Karin Corbin 2010


I wanted to rip the thin strips on the outside of the saw blade. If I had tried to rip them between the blade and the fence they would have shattered from the stress. To get all the strips the same thickness I created a quick and easy to make gauge.


My jig is just a piece of scrap plywood and a piece of scrap lumber that is double back taped to the bottom side of my purpose made jig. To use it you index it to the side of the table saw top, push your wood or in this case stone against it, then move the fence over to your material and lock the fence in place. Then remove the jig, rip the strip and repeat the indexing sequence for the next strip. You will see that underneath indexing position in a photo lower on the page.
photo copyright Karin Corbin 2010


It takes next to no time or any special skill to make one of these jigs. I simply set the material I was cutting into the correct position for the strip width, locked the fence down. Then I butted the plywood against the material and reached underneath and stuck the taped wood under the plywood overhang making sure I had the strip right against the edge of the saw's table top. No measuring needed to make this jig other than making sure you have the right width for your strip. You can make this jig for any of the miniature saws. On the Proxxon or Microlux tilting arbor saws be sure to move over the plastic table  top extension so you can index to the metal table top. The miniature saw in my photos is from Byrnes Model Machines. Soapstone turns to talcum powder during cutting, it won't hurt the table saw or the blade.

photo copyright Karin Corbin 2010

photo copyright Karin Corbin 2010

Once I had my long strips made I cut them into the right length using my miter box. Use a stop block so all your tiles turn out the same size. I dressed any ragged edges on the stones with a small file before cutting the next tile from the strip. If I had a projection of ragged stone or any saw dust against my stop block then my tiles would not have been the same size. One of my tiles cracked right after I cut it, that was lovely since old stone tiles do get cracked. Perhaps someone dropped a pot on it or a chunk of firewood.
photo copyright Karin Corbin 2010

December 5, 2009

Diamonds really are a girl's best friend

photo copyright Karin Corbin 2009

Diamonds, diamonds and more diamonds. I have lots of them and almost all of them are industrial grade and are not all that expensive.

From a large diamond coated blade in my wet cutting tile saw down to tiny diamond burrs I love them all for what they can do in the workshop. I use them to cut and shape, sand or carve and sometimes even drill stone, ceramics, glass, wood, metal and  foams.

photo copyright Karin Corbin 2009

The items above are diamond coated  files. I love these for sanding small details. Much easier than trying to use an emery board or a grit coated sanding twig and also good value as they last a very long time. Good at shaping metal although I tend to prefer the standard metal, swiss pattern needle files for that particular material use. You can purchase them in different grit sizes and a wide variety of shapes, flat, round, triangular and more.

photo copyright Karin Corbin 2009

The items above are diamond coated cut-off disk that I use in a Dremel Motor. They are not run at high speeds. You saw me cutting a window slot with one. I also cut small glass tubes with them and smooth the edges of cut glass with these. You can use the broad side front or back to sand items as well. They come in a wide variety of grits.


photo copyright Karin Corbin 2009

The items above are diamond coated burrs. I use them in a Dremel Motor and sometimes even a drill press to shape, sand, carve and sometimes drill.

photo copyright Karin Corbin 2009

The photo above shows a tapered diamond coated burr in an overarm router type of setup. I  just used this to create the small bevel on the edge of the wood panels that line the box bed. I tried doing this task with the router but it wanted to splinter the wood so I turned to sanding the bevel instead. I made several passes and ended up with a nice smoothly sanded, beveled edge. There is often more than one way to get a job done!

photo copyright Karin Corbin 2009

The photo above shows using a diamond burr held in a pin vise for a handle. Now they be used as a sanding file for rounded shapes in tiny areas such as moldings on furniture.

Almost all of the items in this posting can be ordered online from Widget Supply, many can be found at your local hardware (iron monger) stores or hobby shops.

December 4, 2009

Cutting a dollhouse window opening

photo copyright Karin Corbin 2009

I was part way through building the shed roofed addition to house the box bed when I decided to add another window in it.

No way did I want to start over again. No way did I want to loose all the hours I spent in making thicknessing, sanding, routing, painting and gluing on the wood paneling that covers the walls.

This situation is very familiar to anyone who has ever modified a dollhouse kit or purchased an old dollhouse and made changes to it after the walls are up.

So here is what I did. I marked out the lines for the window opening. I used one of my very well loved diamond coated cut off disk in a Dremel Motor to cut down through those lines from inside the dollhouse. It is easier to work from outside a dollhouse but I wanted to exactly follow those panel grooves for this window.

photo copyright Karin Corbin 2009

Because the disk is an arc it won't cut all the way through the wood into the corners. In fact I only got a cut through right in the centers of the lines as I am putting in a very small window. But the cut through opening made with the disk was just long enough to feed through a small, razor sharp flush trimming saw.

photo copyright Karin Corbin 2009

Oh how I love these little saws, the blade is thin enough and strong enough to flex a bit without a permanent kink it you don't force it too hard. That allowed me to sneak it inside the walls of this small space and follow the kerf of the cut off disk. Now I have very nice square corners in my window opening. Job done, ready for me to build a window to fit in there.

Hope this method helps you get in a jamb* some day when you want to add another window or door where there was not one before.

Widget Supply is a good place to purchase these diamond coated cut-off disk. Just do a search for diamond disk, be sure you get one with a mandrel so you can mount it in your motor tool. Just like sandpaper they come in different grits.
photo copyright Karin Corbin 2009


My little flush time saw came from Hardwicks Hardware in Seattle, Washington, USA. It is important that this type of saw does not have offset teeth. A typical razor saw does not have offset teeth either. Lack of offset means it will follow along in a groove without cutting into the sides of the groove. You might find something similar in your area and sometimes people call them Bonsai saws as they are used in that hobby for trimming branches flush against the trunks. You can get a keyhole version of this saw too as well as folding handles. The blades are very thin and extremely sharp, they cut quickly with little effort.

*Pun intended, jambs are the wood liners that go against the house framing to trim out a window or door opening.

November 24, 2009

Router bits for dollhouse building

photo copyright Karin Corbin 2009

My Christmas present to myself has arrived and of course I opened it since I knew what it was. A very special set of router bits that are made just for dollhouse miniatures. They fit into a 1/4" shank router. I will use them in my Bosch Colt router on the router table I made for it. You saw that in an earlier posting on my blog.

This router bit set is made by Amana Tools and this set and other high quality miniature carbide router bits can be ordered from toolstoday.com


photo copyright Karin Corbin 2009

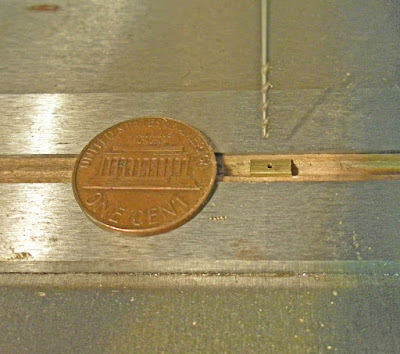
Still learning new tricks for safely working on small parts almost every day. I finally found the brass C channel I wanted for the catches on my window latches so I started making new ones. I decided to cut the pieces to length first. Of course that created the problem of exactly how I was going to hang onto that small chunk of channel so I could drill a hole in it for a nail. As I have already told you brass wants to grab and spin while drilling it. After trying this that and the other I picked up a leftover piece of wood from the windows it was grooved to accept the glass. Oh joy, a perfect snug fit for the channel that put a little bit of grip onto the brass so it would not spin out or shift position when I went to drill into it. Into the vise my wood strip went, supported from underneath to keep it level.

 I put a USA penny in the photo for scale, that drill bit still looks big in the photo but it is only .0292" (.741mm). The smallest size drill bits are numbered, this one is a #69, they are called wire drills.

November 16, 2009

Never enough Vise


You can't make tiny metal parts without good holding devices. The photo above shows a little guide block I am building as part of my window latching system. The square part is a bead I found into which I have drilled another hole. In that hole I have soldered a piece of 1/32" brass rod that has been trimmed to length and will be filed into a point. The pointed rod pin will go into the window frame and help keep the guide block secured in position. A dab of superglue will secure the guide block to the window frame surface. The pin primarily keeps the block from shifting side to side when under pressure and also adds extra surface for the glue to grab onto.

I have to use a needle file to point the pin and also to remove oxidation from the soldering process. Hard to hold anything that tiny with fingers so I have it held in a pair of flat nose, smooth jaw parallel pliers. You can find them on the internet using that keyword description. When the pliers grip the jaws stay parallel along their length. That creates a good grip that is also a gentle grip and it won't scratch my piece. The pliers I am using allow for a long part to go right on through them which is another useful feature. Update: You can now purchase these pliers online direct from my favorite hardware store Hardwick's in Seattle. Click here to order them.
photo copyright Karin Corbin 2009


Another essential tool for making my window locks is a high quality bench vise. The vise on the right is called a pattern makers vise, the vise on the left is an Eron block vise. The long bar in the pattern maker's vise is a parallel which raises the object I am holding up to the height I need it to be but keeps the object squared to the surface and supported from underneath. I used that when drilling the hole in the bead to accept the pin.
photo copyright Karin Corbin 2009
These small vise are created to a high quality standard. The jaws are smooth on the inside. When you tighten them the jaws stay parallel to each other, that is essential for micro machining work. Cheap vises lift one of the jaws as you close them and you only get pressure at a small point when that happens. It will also gouge your work due to that shift out of parallel.

Another good feature is when working with them on the bench I can flip them around from one side to the other and still have a flat surface to rest on the bench. That lets me work on small parts from several different sides without moving the part in the vise.

Every year I add a few new quality items like good vises to my tool collection to help me make small metal parts. I have a Panavise but it just does not compare in ability to the pattern maker's vise for most tasks.

November 6, 2009

Proxxon Miter Saw Fence


photo copyright Karin Corbin 2009

The Proxxon KGS80 Miter Saw is a very nice size for many task when scratch building a dollhouse. Not for the tiny strip wood pieces but great for things like window and door frames, flooring strips and such. However as it is out of the box it is going to launch any small pieces you cut all the way across the room. It is a powerful saw for its size. Good luck finding anything small in the back room of my workshop and of course the parts can be damaged by the journey and landing.

To make repetitive cuts of strips of wood an easier task I built a fence out of hardwood. Now my cut off pieces stay right there on the fence and I don't have to go hunting for them. My custom fence is sized to fit into the existing clamp on the saw. I did not want to modify the miter saw as it is very good for cutting pieces of non ferrous metals in it's standard configuration. The fence is a piece of 3/4" thick poplar wood that is cut to fit into the clamp opening. It is a little tricky to fit the fence in under the motor and on into the clamp, you will have to mess around with the design making adjustments as you go. Do worry a great deal about getting the fence on the back nice and square to the saw blade so it makes perfect 90 degree cut.

I had not used the saw for a while as I knocked off part of the back fence during the move last year. But since I had been ripping strips of hardwood and had plenty of extra it was a quick repair with that rubbery superglue. Now I am back in action again, whew, that feels good. I really like this saw.

If you are going to make a setup like this for your saw keep in mind that the rear wood fence needs to be short enough for the motor of the saw to come all the way down. Look at the photo, you will see the approximate height you need.

photo copyright Karin Corbin 2009

I made my fence base so it extended out further to the left so I can clamp on stop blocks. A long stop block will reach in quite a ways towards the center.


It is very important for your safety that you need to know the correct way to use miter saws with stops. You must secure the wood you are cutting some place between the saw blade and the stop block. If you don't the wood will get into a pinching situation and the part can be damaged and so can you.  Sometimes there is room for your fingers to do the clamping but don't take foolish risks. The eraser end of a pencil gets where fingers won't but sometimes even that is too big.  You can make other kinds of  custom hold down pieces as needed. When it is impossible to get in there with any kind of a clamp make a removable stop. Secure the work on the other side of the blade instead where you can get a grip on it.

You can find out more information on the Proxxon KGS80 by clicking "HERE"

October 15, 2009

Using Calipers

photo copyright Karin Corbin 2009

A tool that gets used all the time in my workshop is a digital caliper. They range in price from several hundred dollars for a very high precision unit to about $30.00 for a unit that is just fine for  most tasks in house holds or the average home workshop.

You will see two of my calipers in the photo above, the one on the top is by Mitutoyo, I have had them for a number of years and use them for tasks in manufacturing workshops where precision is important. The caliper at the bottom of the photo is a pair from WIXEY I purchased about 6 months ago, it will read in fractions. Most fraction reading calipers are not very accurate but this pair is reliable in that you know there is only a four thousandths spread in which it will read the fraction. Huh you say? OK so a 1/4" in decimals is .250". The caliper display reads 1/4" in fractions anywhere between .248" and .252".  Plus or minus .002 (two thousandths) of an inch is not an uncommon tolerance in manufacturing. But in miniatures you can see that gap if you are looking for a really snug fit. Most inexpensive digital calipers that read in fractions are not all that accurate, the Wixey pair is very nice quality.

So the conclusion is that fractions are OK to think about in general terms but working in decimal inches or in millimeters is way easier for math and digital calipers are so easy to use it makes no sense to me to worry about trying to mark or cut something to 1/64" or 1/32" and then read it off a regular ruler. It does not take long to memorize .25" or .50" or .75" or .125" instead of the fractional unit. If you can't remember there are a lot of free charts you can print from the internet that show the equivalent decimals, fractions and millimeters. I have a few of them around the shop for quick reference.

In the photo below I am measuring an inside dimension. I am going to divide that result in half and mark the centerline for my muntin location to divide up the panes in the glass area on the door. You can see the prongs on the caliper I am using for an inside dimension, I just slide open the caliper until they touch the wood.  I  look at the display to know just how wide that distance is. I love it, so easy on the eyes, no strain trying to see a the tiny line reads on a ruler and then try to see the tiny marks to figure out what fractional division it is by counting the marks. With a push of a button I can display the dimensions in millimeters instead of  inches.  On some calipers I can also read the results in fractions. But I personally almost always work in thousandths of a inch. This is a real time saver way to measure that also increases the quality of the miniatures.
photo copyright Karin Corbin 2009


In the photo below I am measuring the outside width of the door. You can see the edges of the blades I am using for this task.
photo copyright Karin Corbin 2009


In the photo below I am measuring the height of an object. The flat blade is placed against the table and you can see the flat edge of the blade that sits on top of the object.
photo copyright Karin Corbin 2009

In the photo below I am using a small protruding pin at the end of the caliper rule to measure a depth. You can use this method to measure the depth of narrow recessed areas such as a dado groove cut to fit a tenon.
photo copyright Karin Corbin 2009
After ten minutes of using digital calipers  you will be spoiled rotten and totally frustrated if you happen to misplace them. They are not just for engineers or geeks and there is no reason to be intimidated by the idea of using this tool, they won't bite you and they make the math very simple.