 |
| photo copyright Karin Corbin 2009 |
My Christmas present to myself has arrived and of course I opened it since I knew what it was. A very special set of router bits that are made just for dollhouse miniatures. They fit into a 1/4" shank router. I will use them in my Bosch Colt router on the router table I made for it. You saw that in an earlier posting on my blog.
This router bit set is made by Amana Tools and this set and other high quality miniature carbide router bits can be ordered from toolstoday.com
 |
| photo copyright Karin Corbin 2009 |
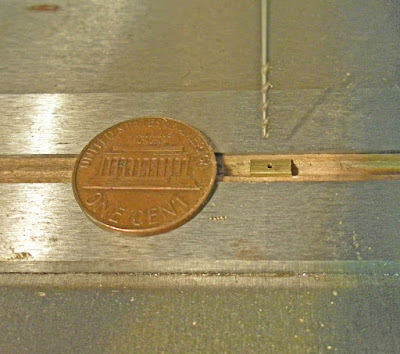
Still learning new tricks for safely working on small parts almost every day. I finally found the brass C channel I wanted for the catches on my window latches so I started making new ones. I decided to cut the pieces to length first. Of course that created the problem of exactly how I was going to hang onto that small chunk of channel so I could drill a hole in it for a nail. As I have already told you brass wants to grab and spin while drilling it. After trying this that and the other I picked up a leftover piece of wood from the windows it was grooved to accept the glass. Oh joy, a perfect snug fit for the channel that put a little bit of grip onto the brass so it would not spin out or shift position when I went to drill into it. Into the vise my wood strip went, supported from underneath to keep it level.
I put a USA penny in the photo for scale, that drill bit still looks big in the photo but it is only .0292" (.741mm). The smallest size drill bits are numbered, this one is a #69, they are called wire drills.
5 comments:
Karin, you are brilliant! I love your window hardware, so realistic as usual. And thanks so much for the link for the router bits! I have been wanting tiny bits for ages but never found anything suitably tiny. So many possibilities! Now, to get less scared of the router table...
No brilliance involved, just lots of trials and tons of error on the way to a workable solution.
Don't worry so much about being afraid, it might never go away. I am always somewhat scared of failing in an attempt maybe more so than getting hurt but it is all part of the same thing. It sure slows down production time when I have to work up the courage to get started.
My best advice to you is to practice making the movements of safely pushing the wood along the fence without the router bit in the way before you ever turn on the machine. Learn to control your movements, then add in the scary part and it won't be nearly so overwhelming when the motor goes on and the bit bites into the wood.
Just like your mother told you don't take too big of bites at one time. Every bit is a little different in how much cutting it can do at once and how fast feed the material and every wood type is different too. Make sample tries before you make the real thing.
I have just removed the link to Trend Routers of the UK. When I went to their website today the dollhouse router bits had all vanished.
Hello Karin,
I was thinking of getting this exact same set, but am still debating. Have you had the chance to work with them much yet? The profiles seem very detailed, I'm having some trouble envisioning all the possibilities, but know there are a lot! Also, with as intricate as they are, is the Colt's depth adjustment sufficient when combining shapes/bits on a single trim? Thanks as always, the new dollhouse is coming along great!!
Dan
The Colt is pretty good for depth adjustment it is a direct screw movement but it will have some minor backlash. I suspect it is a metric threading but I don't know that for sure. But as an example to see just how far you have moved if you have a screw with 32 tpi (threads per inch) then one complete rotation will give you a 1/32" change in linear distance. A screw with 16 tpi will equate to 1/16" movement.
When I really want to fine tune depth I use a different router table. I have a router table with a lift that has the ability to adjust the depth using an Allen wrench from the top of the router table. The wrench goes down through a hole into a fitting on either a router base or a router lift. The newest versions of this kind of router table has digital readout.
I have added an after market digital readout to my router table with a lift, it is made by Wixey.
http://wixey.com/
But owning a DRO (digital readout) does not mean you don't have extra work to do.
You still have to get out the calipers and measure twice on sample pieces before you make your final product.
You still have to set and calibrate that digital readout to a zero position so when you make a change you know where you are at.
You have to test your router lift for backlash so you can compensate if needed.
That is just what it takes to do it right so you might as well get used to doing that.
Post a Comment