June 5, 2012

Cutting Dormers: part 2

photo copyright Karin Corbin 2012
Cutting dormers for the Elizabethan birdhouse part 2.

This time I am using the same miter slot sled jig I made in part 1  to cut a dormer for the back of my structure and also  the two side gable  ends. These pieces are triangular without any vertical side lengths. I have changed the angle of my miter fence using the 60 degree drafting triangle and now the base of the triangle will rest against the fence unlike in part 1 where the vertical sides were resting against the fence.
photo copyright Karin Corbin 2012

The first step was to cut a piece of material to the width of the base of the triangle given in  my measured drawing.
photo copyright Karin Corbin 2012

The right side of my jig was cut off by the saw blade so that is an easy indicator of where the actual cutting line is and I will make use of it as the registration for the point of my triangle. All I have to do is place a scrap piece of plywood at the corner where the fence and that right side of the jig intersect. Then I butt the material I am using for the dormer over to that location, remove the scrap and while holding the material down on the jig against the fence I slide it on through the saw blade to make the first cut. I always turn off the saw motor and let it come to a full stop before removing the part from the jig or trying to remove the waste cutoff piece.

photo copyright Karin Corbin 2012
Now flip your material over, register it again to that same intersection as in the last step (don't forget to remove that scrap you used to located the corner of the triangle) and then cut the last side of the triangle. The peak of your triangle will be perfectly centered across the width and that means it will also be the correct height. This is a very simple method once you get the hang of making triangles this way on your table saw. But if you are going to do lots of them exactly the same size for a production type of product then use a stop block on the left end of the fence instead of registering your pieces it to the corner each time.
photo copyright Karin Corbin 2012
I will do a post on making the roof cuts for the dormers later, it involves making compound cuts, a bit more complicated as you have to make a left and a right side but  it is  also done with a miter slot jig.

Elizabethan birdhouse

Cutting dormers part 1

Cutting Dormers: part 1

photo copyright Karin Corbin 2012
Cutting dormers for the Elizabethan birdhouse part 1

I still remember the days when I did not know how to approach making things like dormers for a miniature building. Lack of knowledge and often a lack of tools is where we all begin. This being a teaching blog I will show you how I am cutting the pieces for the front of a dormer that has a steep roof pitch. There are a number of methods to make these cuts and I don't always make them this way.

The miter angle fixtures that come with table saws won't rotate past 45 degrees but for this house I have to cut a sharper angle than 45. The method I chose  is to make a single runner miter sled for my 10 inch table saw. I have a number of pieces to make using this particular angle so the jig will be useful for insuring all the parts get cut to that same exact angle without variation.
photo copyright Karin Corbin 2012

The runner that goes in the table slot could be made of hardwood or if it is only going to be used a few times pine or basswood will also do the trick.  I am using a metal slide since I have one that I can unscrew and use it again and again for other jigs if I wish. As you will see I am using materials out of my scrap bin for the sled base and for the fence as well. Actually the plywood came out of a neighbor's scrap bin, I am not too proud to use his leftovers!
photo copyright Karin Corbin 2012

As I am cutting this roof at a 60 degree angle I am using a  drafting triangle with a matching angle to accurately establish the angle. I place the edge of the triangle right against the saw blade being sure it is not resting on any of the saw teeth, sneaking it between them, touching only on the flat of the saw blade. I have attached the fence to the base with double back carpet tape, it is plenty strong enough to hold it in place without shifting. I am using double back tape because I am going to reposition that fence to a couple of other angles for other dormers and gables and dormer roofs before I am done with all the cutting on this structure.

This first dormer front wall I am cutting has some vertical sides on it. Other dormers and gables I will cut are simply triangles with no vertical sides on them. I am showing those in other postings.

photo copyright Karin Corbin 2012

First the dormer plywood material is cut to width. Then I mark out how tall the vertical sides are. I make sure the mark at the point where the roof pitch starts gets transferred on down the edge of the plywood. That mark is going to be aligned with the cut edge of my miter jig. See photo above, it will enlarge if you click on it. This is a quick, simple and accurate method of aligning the starting point of the cut for the sloped roof line on the dormer.

photo copyright Karin Corbin 2012

The first cut goes just past the point of the peak.
photo copyright Karin Corbin 2012

Then the board is flipped, aligned to the mark and the second cut is made.

photo copyright Karin Corbin 2012

Notice how my board is left longer than the length of the small dormer, it gives me good registration against the fence. I will cut the second dormer piece I need from the other end of the board. That butterfly shaped piece left in the middle will still be there for a nice long registration against the fence.

That center waste piece has complimentary angles that will soon be recycled into making yet another miter sled jig for cutting the timber frame trim pieces that will go onto this dormer and on the gable ends of the house. Be sure to watch for opportunities like this because they give you those exact matches on angle cuts that will fit perfectly onto your house parts. I will show you the jig I make from it later on in this blog.

If I was making a dormer with equal side lengths I could have used a stop block on the fence for the second cut. But these dormers are on each side of another third dormer that sits between them and the peak is not centered across the width of the dormer.  You can see the dormers I just cut on the CAD model in the image below. They are on the left and right of the center dormer. Elizabethan birdhouse image below.
photo and design copyright Karin Corbin 2012
Link to Cutting Dormers: Part 2
Link to Cutting dormers: Part 3

June 2, 2012

Recipe For A Birdhouse


Before I started cutting the Elizabethan Birdhouse I thought it would be fun to stack most of  the ingredients on the counter and list them as if this were a scratch cooking blog rather than a  scratch miniature building blog. So exactly what does go into a project like this?

Lumber:
1 sheet of 7mm marine plywood
1/4 sheet of 9mm marine plywood
4 board feet or so of Black Cherry
1 board foot of  Western Red Cedar

Bricks and Chimney:
Block of raw red clay
Glazing stains
Grout
Polyurethane adhesive caulk to stick the kiln fired pieces to the structure

Windows:
Antique style, seedy (little bubbles) glass with an iridescent coating of gold tone with glows of blue, green, red. Helps obscure daylight view into the structure but lets light shine out at night
Roll of narrow copper foil tape
Solid core solder
Flux
Chemical patina solution to darken the solder
Window Glazing Putty

Door hinges:
Brass Sheet Metal
Brass Screws to secure hinges to door frame
Brass Brads to clinch the strap hinges to the door
Chemical patina solution to turn the brass black

Stucco:
Bucket of exterior grade, elastomeric "Venetian Plaster"
Artist acrylics to add aged detailing to stucco
Primer paint 

Roofing:
Marine Plywood
Thin Fiberglass cloth and epoxy with filler  to seal and reinforce roof joins
Copper sheeting to be cut into shingles
Solder
Blue-Green Chemical Patina Solution

Birdhouse Hole Entry:
Copper Plate from recycling sources
 Blue-Green Chemical Patina Solution
Solder
Polyurethane Adhesive 

Adhesives:
Acrylic adhesive caulking for the wood to wood joins
Polyurethane adhesive caulking for metal to wood joins

Misc supply:
Noel and Pat Thomas "Bug Juice" to stain the Black Cherry wood a dark gray
bronze screws
galvanized brads

LED Lighting:
Not shown as I have not purchased the LEDs yet

Instructions:
3D CAD Model for reference and to generate measured parts drawings
There are no assembly instructions for the more than 1,000 pieces most of which will be fabricated out of that stack of materials.

There is no point in asking me how many hours this will take to complete as I have no idea. It is a labor of love and will be going to my brothers house. There is no deadline which is a good thing as I lost most of last year's labor time to due health issues and this year I can only put in time on my "better" days which means it is a slow cooked recipe. But perhaps the flavor of it will be all the richer for that fact.


May 22, 2012

Nonsuch House


 Above are the front and rear facades of the new birdhouse. The design work is now 95% finished. The roof edges still need trim, a few other little trims pieces to tuck in here and there. The carving details will be designed later when I have the real parts to work with.

This Elizabethan birdhouse has been named "Nonsuch", not to be confused with nonsense. Unless of course you realize that non-sense means I haven't got the sense to know better than to use a tiny artist trowel to put stucco in between that many jig sawn puzzle pieces. I foresee watching/listening to a great many movies and audio books to get me through those endless stuccoing sessions.

Nonsuch is an old English word. Henry VIII had a Nonsuch palace done in the Tudor style, long since destroyed.

There was a Nonsuch House in Elizabeth I time, also long since destroyed. Now that was an interesting structure, it sat on top of the Medieval London bridge, it too had a passageway through the center and it was also timber framed. The structure was prefabricated in Holland, taken apart, shipped over and then put back together on top of the bridge. I wonder if it was burned up or taken apart and the pieces reused to make other buildings?
Photo of a model of the old bridge at the Dockland's Museum:
http://www.flickr.com/photos/bensutherland/6871737215/in/photostream/

So Nonsuch it shall be because it is after all a bird palace and there is none such other birdhouse around although there are other real life, very large, Elizabethan birdhouses also known as Dovecotes.

May 6, 2012

Dollhouse Hill

photo copyright Karin Corbin 2012

The hillside  above my workshop is the land of 1,000 dollhouses waiting to be made in miniature.
photo copyright Karin Corbin 2012

It is a beautiful sunny day here so I went up on the hill to take a few photos to share with all of you.

photo copyright Karin Corbin 2012
I love the roof lines of the Tudor cottages with all their clipped gables, quirky dormers and little bay windows.
photo copyright Karin Corbin 2012
If you look at the house directly above and the one shown above that you will see they are essentially the same house. But one has clipped gables, the window in the gable is different as are the shapes of the dormers. The chimney is placed somewhat differently but the overall foot print of the house is almost identical. It is an old builders trick to keep all the houses in a neighborhood looking very different but compatible with the fashion of the era. There are thousands of these 1930's Tudors in Seattle, some brick faced and some covered in wood siding.
photo copyright Karin Corbin 2012


Birdseye view of my workshop and neighborhood

You can click on the photo above from Wikipedia to enlarge it. The yellow arrow points to the building my workshop is in. The neighborhood I was photographing is adjacent to my workshop  up above me on a steep bluff. This  photo also shows the ship canal that leads from the salt water on through to several of Seattle's lakes. The ship canal has a series of locks to raise (or lower) the boats as the lakes are higher in elevation.

The photo below is one I took today on the little public beach adjacent to the workshop. Lots of boating activity this first weekend of May.
photo copyright Karin Corbin 2012

May 5, 2012

Feathering the nest

The male, black capped chickadee, caught in the act of feathering the nest.

April 30, 2012

Parisian Houses in 1610


An engraving showing a street in Paris in 1610. The subject is the assassination of Henri IV, king of France. Photo from
http://en.wikipedia.org/wiki/File:Assassination_of_Henry_IV_%28Henry_IV,_King_of_France;_Fran%C3%A7ois_Ravaillac%29_by_Gaspar_Bouttats.jpg

Are you surprised to see the Dutch influence on these houses in Paris?

The old houses such as these were all destroyed to make way for new buildings, part of the plans to create the most beautiful city in the world. Of course it was not done all in one fell swoop. A couple of Napoleons, war, fire and of course decay all played a part. Oh well and who is to say it was not well worth the results? It is certainly a more liveable and elegant city compared to having winding streets of crumbling buildings.

The Dutch style was also an influence on the brick houses of Elizabethan England in the same historic period.

Elizabethan Gatehouse Mockup

Front of house

It feels good to have finally settled on what I wanted to make for my birdhouse project. A bit of research was done, then next step was making the basic CAD model for the massing of the Elizabethan birdhouse and now I have the cardboard mockup almost finished.

Back of house


The cardboard model turned out very close to my vision. But looking at it I decided I will add a half inch to the height of the second story and trim a half an inch off the lower edge of twin dormers on the front. Those kind of subtle changes are why I take the time to mockup the project in cardboard, I can see these subtle things more clearly. It will be very easy to make those two changes in my CAD model. In the image below you can see where I am querying the CAD model for some of the dimensions I needed for cutting the cardboard parts.

Next I will try adding two fireplace chimneys to the roof of the cardboard model. Chimneys are a lot of work to make and they are also an issue in terms of holding up to weathering outdoors. Therefore I will have to decide if I feel they are absolutely essential or not. They are a significant design feature on Elizabethan buildings so I must try them to see if they contribute to the overall impact.

After that chimney decision is made I will start putting all the details into the CAD model, the doors, windows, trims, brackets, timbers, etc. This birdhouse is really going to be loaded with lots of architectural details and carvings.
Cutting board and tools

There will be two birdhouse boxes built into the first floor. This piece is going to be sent to Texas so I will be sure to add lots of insulation and cross ventilation so the bird boxes don't turn into ovens in the hot sun. A historic form of early settler's house in Texas is called a "Dog Trot Cabin". It is basically two cabins joined with an open roofed breezeway between them. That design feature cools the building. If you look at this Elizabethan Gatehouse design you will see that I am going to take advantage of the same kind of cooling feature for my feathered friends.

The second floor and attic dormers will have glass windows in them. Inside the structure I will add low voltage LED lighting to shine out them at night. So not only is this piece going to function as a birdhouse, it is also a lamp and of course first and foremost it is an outdoor sculpture.

It could also be a dollhouse as I have designed it in 1:12 scale but than was not what was requested and it would take a lot more time too.

April 28, 2012

Fine tuning for miniatures


The other day I noticed the throat plate on my 10 inch table saw was a bit wobbly, not all of the leveling screws were touching the supports underneath. I was cutting a length of wood that was shorter in length than the throat plate so it became a safety issue and of course also a quality issue. Time for a precision tuneup. I cut large lumber pieces into strip wood down to about an 1/8 inch or so on this saw so I need  accuracy from it.

Not all tablesaw throat plates mount and level the way mine does so you will have to figure out the best way to level yours. But it is important to make sure it is flat and very close to level side to side and front to back.

The first thing I do to the throat plate is make sure it is flat. Then I take a file and flatten the ends of the adjusting screws. The ends of machine screws are typically  rough with burrs around the outside edge left from the manufacturing process.

Leveling can be done with the use of a straight edge resting on the table top sliding it back and forth to see if it hits but that is a rather clumsy and hit or miss method, you can't really see how close you are to dead level. All you can tell is if you hit an edge. Better than nothing though and that is how I used to do it. Nowadays I use a dial indicator gauge mounted in a holder. This is not expensive, you can get the setup for around $20.00 but you do want to be sure you have an extension for the feeler end of the indicator so it reaches the table. Dial indicators are useful for other kinds of tool setups as well such as working on lathes, seeing drilling or overarm router depth and router bit heights in standard router tables.
http://www.grizzly.com/outlet/Magnetic-Base-Dial-Indicator-Combo-President-s-Special/G9849

I start by leveling each end at the center then check the level at each of the four screws, then back to double check the two ends. When finished all screws should be firmly resting on the support underneath with no rocking. On this big saw I leave the back end of the throat plate about  half a thousandths high and the front end about that same amount low. That prevents the wood from potentially catching when I make my cuts.

For precise cuts like dadoes in miniature furniture or for cutting and tiny strip wood pieces or miniature furniture pieces then I use a 4 inch or 2 inch miniature table saw. Be sure you have level throat plates on these smaller saws.  It is not a worry with the Preac or Jim Byrnes table saws as they are designed and made level (unless you bend one) but it can be an issue on Proxxon, Micromark and Dremel table saws.
Since I had out the tools I use to calibrate my saws, lathes and such I went ahead and checked to be sure my table saw blade was still square to the miter slot and that the saw fence was also in proper alignment. I am using the same dial indicator type but a different holder that fits into the miter slot. One of these days I need to make a miter slot fixture for my miniature table saws, no one sells that item.


Saw cuts, drilled holes, routed edges are only as good as your hand control for feeding them combined with the quality of your tools but also it also matters how you set tools up and care for them.

April 25, 2012

Elizabethan Era


The image above is of Little Moreton Hall from Wikipedia. This building is one of many Elizabethan structures that inspire me.

I have changed direction once again on the birdhouse I am making for my brother.  There are a lot of half timbered buildings from the late 1500s and early 1600s that I find to be inspiring including the Stokesay Castle Gatehouse, one of my all time favorite buildings. Old hand drawn illustration of it below
Wikipedia Image common license


But I don't want to try and replicate an existing building as much as I love the Stokesay Castle Gatehouse. I prefer to design my pieces "in the style of" an era rather than creating a scale model. For one thing I don't have direct access to old buildings here in Seattle unless I count the authentic Tudor Manor house that is near Tacoma, WA. It was taken apart and shipped to the USA then reassembled brick by brick. So this morning I got busy in my CAD program and began designing an Elizabethan Gatehouse to build in 1:12 scale. The basic size and shape of the building is now finished but not much in the way of fine details. That is how I work, first the massing study for overall impact and balance then later I start embellishing the surfaces with all the details.

No interior needs to be done as it is not a dollhouse. I will be putting my recently upgraded carving skills to good use on it! Tonight I will start cutting walls, first in cardboard, then the marine plywood I use for birdhouse substrates. I can't make any mistakes or redo the plywood pieces, too expensive and hard to come by that material in recent years. That is one reason I no longer make many birdhouses. Local shipbuilders have been on an almost year long waiting list for their materials.

My recent list of films to watch have included Shakespeare in Love, Anonymous and Elizabeth. A little bit of synthetic time travel, amusing as well if not completely authentic in details.

Elizabethan birdhouse 

April 19, 2012

dragon of the day

photo copyright Karin Corbin 2012
Today's practice carving, 2.5" wide from pear wood. I am on a dragon kick this week, a few more to go before I move on to other objects. This dragon design is based on the classic S scroll style with some foliate details. His head is one end of the S, the tail the other. If you look at the dragon from the other day you will see it is also based on an S scroll layout as are quite a few carved panels. http://karincorbin.blogspot.com/2012/04/there-be-dragons.html

I am using up some pieces of pear wood from the end of the slab where there are cracks from the wood drying. It makes good practice wood, the pieces are not too small, not too large.

The antiquing is done using a couple of colors of stain. The first coat is lighter in tone and the second coat is some old thick, dark walnut stain. Lighter stain first keeps the piece from absorbing too much of the dark. Rub it on, wipe some off, wipe more on, hit it with a heat gun, wipe more off and on, etc. It is a random kind of process, not carefully controlled or thought out but it is still effective.

April 17, 2012

There be dragons

photo copyright Karin Corbin 2012
Today's carving practice piece made with pear wood. Width is 2.5 inches.

April 12, 2012

make a stropping wheel

photo copyright Karin Corbin 2012
Over the last couple of days I built a homemade stropping wheel for sharpening my carving tools. It makes them incredibly sharp, even the very tiny 1mm and .5mm gouges can be sharpened to a razor sharp edge with this wheel. There is no risk of overheating or burning the small tools. It will remove any minor nicks as well. A local carving teacher told me how to make this wheel.

The cost is low and the materials are easy to come by. The material the wheel is made from is mat board. Yes, it is the mat board you find at art supply stores and framing shops. You adhere layers of it together with a PVA glue such as Elmers. Be sure you cut accurate circles so you don't have to spend a lot of time shaping it into a true circular surface after you mount it to a motor. I did the final shaping of my wheel with a coarse grit sanding block while the motor was spinning the wheel. The sanding to a true circle creates a lot of fine dust so I used a vacuum cleaner nozzle right next to my sanding area to collect the dust. Don't forget to wear a dust mask! After the wheel is trued you can put honing compound on it.

I used 8 layers of double thick mat board in this wheel. I put weights on the stack of mat board disk while the glue set to prevent voids in the layers. Getting voids is a defect that will spoil the effectiveness of the wheel.

I have glued my new stropping wheel onto a plywood disk screwed to a faceplate so I could spin it with my lathe. It is very important to look at the photo above to see how the wheel should be turning in relationship to the tools you are sharpening. I am standing on the backside of my lathe while I am sharpening my carving tools to get the correct spin direction.

What a difference using this wheel is making in my work. I can't get my carving tools this sharp with hand stropping on leather. The tools now glide through the cuts with little effort or pressure leaving a nicely polished surface. I hear that lovely ssssstt noise as the tools cut. The noise that only happens when you have razor sharp cutting edges with polished bevels.

transfering images

photo copyright Karin Corbin 2012
Using carbon paper to transfer images to wood is a common method. However the layers of paper and carbon tend to shift and when working with miniatures it is even more difficult to control.

Thin pencil leads break or else the lines keep getting wider as the pencil wears down. Also the paper the image is printed on can tear when drawing on it if you press firmly.
photo copyright Karin Corbin 2012

So now I cut a small piece of carbon paper, cut the image to size and use clear cello packaging tape to hold those two items together covering complete over the paper leaving the tape wide enough to stick the image to the surface I am working on.

Instead of a pencil I use a metal scribe held at a slight angle so the point glides along on the surface of the packaging tape. Packaging tape is pretty tough stuff but it does remove without any trouble from the surface of the wood.

The end result is very nice image transfers with good dark lines and it is quickly done because there is no shifting or fussing.

April 11, 2012

practice, practice, practice

photo copyright Karin Corbin 2012


This pattern is really hard to cut because of all the curves, it frustrates me to do them because I can't get the big curves as even as I would like them to be. My hands are simply not yet fully trained for carving movements but day by day I am gaining on it.

This piece was from a piece of the free walnut wood I got the other week, nice and dark and the grain is OK, it carves nicely too. I think I will start making some trinket boxes out of the better practice pieces. One of these days I will have something good enough to use for furniture in my miniature cottage project. I need one or two chest, a table, dish cupboard, chairs, a bed, etc.

I have had to make a few more carving chisels, wish I had some more smaller gouges too. I had to switch out to my larger magnifying lamp and even the short pear handled gouges hit the lens. Always something to frustrate me while making miniatures...

April 4, 2012

tudor rose

photo copyright Karin Corbin 2012
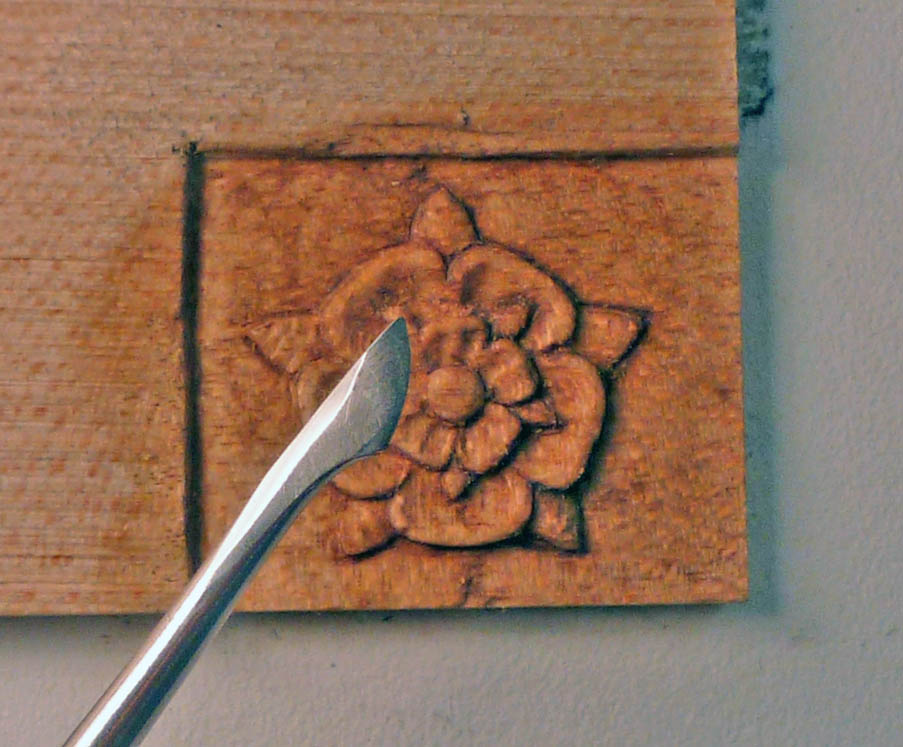
I am not yet close to being good enough at carving to satisfy my personal standards anytime soon but I am getting better at small scale carving. This rose is .75 inches side to side, I want to be able to make it perfect at half that size by the end of the month. I did not get in very many hours of practice in the last week so I was pleased to see any improvement when I made this carving last night. Spending time watching video carving lessons has helped despite the lack of practice just as the teacher in the videos said it would. The only problem is I kept falling asleep watching the videos.

In the photo above is a wax carving tool I modified to be similar to the shape of a Ray Gonzales Hooked Skew Chisel The shape of his skew chisel intrigued me and there are many good reviews about it. However it does not come in a size for carving small scale miniatures so I decided to give it a go to make one. After I modified the shape I took it to my neighborhood knife maker for a professional sharpening. The tool looks bigger than it is as it was much closer to the camera than the carving.

I really like this little tool, it does a great job of detailing in tight spaces. The curve keeps the tips from digging in when using it for background cutting. It can also be used as a scraper for smoothing out problem areas. The cutting edge is 7mm from tip to heel. I would like to have more of a hooked point at the heel but that will have to wait until I have my knife guy custom make me one from high carbon, high quality steel that will hold an edge for a long time.

February 23, 2012

Cherry spoon finished!

photo copyright Karin Corbin 2012


photo copyright Karin Corbin 2012

My little spoon is done! If you click on the photo to enlarge it you will see how perfect the grain of the Flowering Cherry tree branch was for the project. Such a lovely piece of wood. The final carving and finish work is done with the edge of the knife using a scraping motion that goes with the grain direction. Shearing the wood leaves a smoother finish than sanding.

Time to get back to carving practice with pear wood and some medieval designs.

February 21, 2012

Cherry spoon


A miniature spoon made from a freshly cut branch of Flowering Cherry.

Driving along the street yesterday I saw a pile of branches sitting by the road waiting for the yard waste recycling pickup day. The branches are green wood, they were only cut a few days ago.

I have been following some articles on carving full sized spoons. They all say to work the wood when it is freshly cut as it easy to carve then. And so it is....
At this small size there seems to be no danger of splitting while drying. The surface is rapidly drying as the carving is being done.

Most of the work was done with a knife. I only used a gouge to scoop out some of the bowl material. I did the basic carving last night and after air drying all day I did the finish sanding tonight. You can't sand a wet surface without getting a lot of fuzz. I used a diamond coated, ball shaped, burr to help sand inside the bowl.

The Flowering Cherry branch was very fine grained. It does leave some pink color near the bark when peeling it and also some pink by the pith when I split the branch. But most of that fades away as the surface air drys. Any kind of species of fruit tree pruning should work for making a miniature spoon. But the base of the branch needs to large enough in diameter the spoon fist onto one half of the diameter plus some extra as you have to avoid the pithy center.

Time to get out the magnifying lenses and do the final touch up on my spoon. You all know by now that the macro photography reveals all the flaws, tiny things you can't see without high magnification. The transition between handle and spoon is too thick, overall the spoon needs more to be thinner, more delicate looking. Chunky looking miniatures are rarely going to work in a miniature setting other than a child's dollhouse.

Get out your pruning tools and head outdoors!

February 7, 2012

Celtic Heart


Once a month I get together with a few girlfriends to play with miniatures. We take turns hosting the gathering. This month I hosted the group at my workshop. The projects we choose vary, sometimes we work independently other times someone will suggest a project to share. I offered to show them how to do some miniature sized carvings and since Valentines Day is coming up I chose a heart design from a Dover Publishing book of Celtic Designs.


I had a piece of poplar wood that was cut thin and wide enough to fit the design. I have stained my piece to look like old English Oak for no particular reason other than I felt like it. After I was done carving the piece I cut around the outside edges with a jeweler's saw.

I might turn this project into a necklace or maybe I will put a pin on the back of it. I suspect I suspect it will become a random, surprise gift for someone on Feb. 14th. Maybe my favorite barista will be the one to end up with it.

I used Dockyard brand miniature carving tools for this project. They come in sets or as individual pieces. The sizes range from 1.5mm up to a 5mm width. Two are two issue I have with the Dockyard chisels, first is they don't hold a sharp edge for very long and second there are no shallow or medium sweeps available on these U gouges, only a full half circle, what is called a deep sweep, is available. This really limits what you can carve with them unless you grind them down to create a shallower sweep. A better option for much higher quality made miniature sized carving tools is to buy Ashley Iles block cutting gouges. Available in the USA from www.toolsforwoodworking.com.

photo copyright Karin Corbin 2012


photo copyright Karin Corbin 2012


It is a trick to sharpen a tool that small. The chisels are easy enough to deal with but the gouges used to be a challenge for me. However I just learned a trick that makes it easy. Take a piece of softwood such as pine or basswood and use the gouge to carve a groove into the wood. Each size of gouge gets its own custom groove. Put some honing compound in the groove and use a pull stroke on the gouge to polish the beveled edge at a 20 degree angle. The honing compound quickly brings up a lovely mirror like polished surface and it creates a razor sharp edge. On the side edge of the block turn the chisel over and use the inside curve against the wood to carve a matching shape and use it to burnish the inside edge to remove any burrs left from the honing process.

As you are carving and the carving tools start to feel a bit dull give then a few strokes on the honing block and they will be sharp once again. No need to regrind these tiny tools if you take good care of them.