December 21, 2009

Light check = OK to go

photo copyright Karin Corbin 2009

My lighting for the box bed seems to be good enough that I can go ahead and put a roof on it.  I can see into the box bed from a dark dollhouse interior;  it won't be overly bright once there are lights in the rest of the dollhouse and there are still shadows inside the box bed.

photo copyright Karin Corbin 2009

There is enough light to see the carved baby bed looking into the little window in the box bed.

photo copyright Karin Corbin 2009

I can also see the carved baby bed from the outside the dollhouse looking through big window on the front of the dollhouse.

photo copyright Karin Corbin 2009
There are some white light bright spots on the walls up at the top of the room from the spot light but that won't be possible to see once the roof goes on.

For my test I took one wire from each of the lights, twisted the bare ends of wires to form a pair of wires. That made two pairs, you could call one a positive pair and the other negative if that terminology makes more sense to you. I then put one of the pairs under the screw on a small terminal block and then the other pair went on the strip next to it. The other side of the terminal strip has a wire under it that comes from a 12 volt transformer. If you look closely at the terminal block you will see that there is a divider in the middle that prevents the negative and positive pairs from coming into contact with each other. If they contacted it would create a short circuit and blow the fuse  in the transformer. As long as you keep your pairings from getting mixed up you will find that dollhouse wiring is very straight forward and very easy to do. One wire from a light bulb goes to one bundle, the other wire from the light goes into a different bundle. You can color code those wires coming off the light bulb, just make one of them black with a felt tip marker if you like. If you enlarge the photo you will see where I have used a black marker on the ends of one of the pairs.

So wherever you make joins all the wires in one bundle would be black, all the wires in the other bundle would be white. They must never make bare wire contact between white bundle and black bundle. Color coding will make visible and simple to understand what is happening and very easy to avoid mistakes. Just remember you never want both wires coming from a light bulb ending up in the same bundle on its way to the transformer. If you can keep that very simple rule straight in your head then you can successfully wire a dollhouse and get everything to light up. White to white, black to black, never mix them up in the same bundle.

December 19, 2009

Little by little


The box bed room is now glued to the side of the main house wall. I have finally made a commitment that says no more major changes can be done to the inside of the box bed.

Still fighting that chest cold and it is really limiting how much energy I have for working on the dollhouse. But I am making some progress if only 10% of what I would hope to be doing. I hesitate to bludgeon my art work with a cold's huge deficit of patience and lack of the required imagination that drives the creative process. I don't have the whole project planned out in every detail, I let the house "speak to me" as I go. I know the general direction I am heading but make thousands of decisions along the way.

I was complaining to Don about how long it was taking me to create this bed shed. He replied, no longer than building the real thing which is  what you are doing. That is a valid point as there are just as many pieces of paneling, just as many window trims and such. Also you have to consider I need to create my own paneling, it is not something I run to the lumber store and buy needing only to be cut to length. I have worked on projects like this in real life houses and Don is right, it takes about the same amount of time but the illogical part of me says it should only take 1/12 the time.

I had a funny little shed room like this on a real life house I lived in a few years ago. It was part of a bedroom but I never thought to turn it into a box bed. It did not have a sloped ceiling  as it was built under a deck for the room above. It did have a salvaged window in it. That was also the house where I setup my first workshop for making miniatures buildings. It was an interesting home, there was even a widow's walk up on the roof for viewing ships passing by out on Puget Sound.

Back to work, the photos above have shown me some things I need to touch up.

December 18, 2009

Christmas Village Lighting


My client who commissioned the Santa's Workshop specifically wanted a place to display a 1:12 scale ceramic Christmas village that was created by "Sylvia Mobley". They really are special little houses and there are openings in the windows that allow the light to shine through. It is difficult to see that in this photo but this really is a lighted village.

Creating a mantel piece over the fireplace was straight forward but how to do the lighting to shine out the windows? I did not want wires strung along the top of mantel, that would have been clunky looking and the houses would not have sat flat and secure. So I came up with a different idea. First I decided on a location along the mantel for the various pieces my client had purchased. Then at those locations I drilled a hole through the wood of the mantel that was the same diameter as a "Cir-Kit Concepts candle socket".  I also cut grooves in the underside of the mantel to those holes to handle the wiring for the lights. The candle sockets were mounted so that the top of the socket was flush with the mantel in case anyone should ever decide not to have a Christmas Village up there. The bulbs are replaceable which is another nice feature.

December 14, 2009

Ready to install


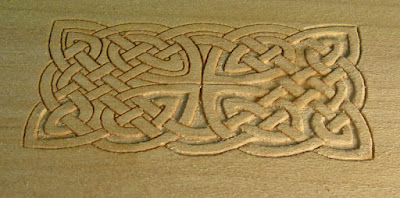
The Celtic knot carved panel is complete and ready to install as soon as the finish is dry.  Now I had better get all the support pieces that hold it in place glued into the box bed and painted.

This is a sneak preview of the type of details I will be putting on my line of  furniture for dollhouses that  I will eventually make and sell. It can be used in cabins, bungalows, cottages, fairy houses, witches cottages, Santa's workshops, castles and houses of many other eras including Arts and Crafts and today's homes. Timeless is a good description for it.

December 13, 2009

Quick start carving


I have started work on the front panel of the box bed cradle. Continuing the theme of sailors and ropes I selected a Celtic knot design from a Dover publisher's pattern book that came with the images on a CD. I resized the image to fit my cradle.

The photo above shows the carving work as it is progressing. Some areas just have the pattern incised, others have the background removed and a few have the "ropes" just about finished up.

I am very fortunate to have access to a friends laser cutter and I used it to transfer the image I chose to my piece of wood. Now most people stop there and use the laser carving as the finished carving. While pyrography, a word meaning writing with fire, has been around since the days of the cave man that was not the look I wanted for the cradle. I wanted a hand carved panel with deeper detailing.

I could have used a piece of carbon paper to transfer the design to wood and then used a hot knife to cut in along the edges of the pattern. I have used that method on carvings before and it works nicely to help prevent broken carving details.

So here are the steps, transfer the detail and cut along the edges straight down into the wood with a knife or laser. Next remove the deeper background areas with a small knife and chisel. Jeweler's gravers are terrific micro chisels that fit into small spaces. Remember those diamond burrs I showed you a couple of postings ago? I am using those as hand held sanding sticks and also using needle files as the abrasives to help round over the roping details and also to smooth the background.

I hope you all find time for a bit of creative fun today.

December 7, 2009

Kribje

Photo courtesy of Wikimedia Commons, click HERE to go to the website.

The photo above is from Wiki, it is an old box bed from a windmill, the Langerak de Westermolen in the Netherlands. I was sent to this web site by one of my followers, Evelien, her blog is to be found at http://ejacreates.blogspot.com/  thank you Evelien for taking the time to share this with me. The photo above  does have that quality that makes one think it might be a picture from a dolls house but it is a real building.


I think the crib very inspirational and I am going to put one in my own bedstede (Dutch for box bed). That is what I am working on today along with hopelessly trying to catch up on other neglected work.

Work and the blog have been slow this last week as I have caught a cold. I know why they call it catching a cold as I can't seem to get warm. It does not help that the weather will be lucky to get above freezing today and for several more days to come. Little work gets done when all you really  want to do is go back to bed and snuggle up with the cats to comfort you. Oh well only another week of this misery to go before I get back to normal. At least it is not a severe cold, I dosed it with zinc right away and that seems to have made a difference. Anyway enough about my little bit of misery it will soon be over.

I added that tiny extra window I showed you how to cut out just so there would be a glimpse of the little baby's crib in the box bed. That window is the only way to view into the far corner of the  little shed addition. You can reach your hand in there to tuck in some blankets and arrange the bed linens but you can't see it other than through the window. I have thought about making the roof removable but I don't like the potential that would create for damage to the roof section and it will make it hard to create realistic lead flashing details.

I hope to make real slate shingles for that little bit of a shed roof. However it remains a mystery to me if that will happen or not. We shall see sometime soon if that will happen or if I will make imitation slate. I have purchased thatching material for the main roof. But this shed was a later addition to the building and I think a change of materials is interesting. Also it will work color wise as the slate is grey with slight brown, blue and green undertones and that ties in with the timbers, the trim colors and landscaping.

Perhaps it seems a somber color scheme to you but I think it will evoke the mood of the coastal shoreline with weathered drift wood, water, mist, rocks and sand. There is not a lot of brilliant color along the shores other than the blue of the sea and sky and the occasional wild flowers or brightly painted boat and brilliant sunrise or sunset.

The inside of the house will have some sparks of color. The box bed walls are a nice golden yellow, a small ray of sunshine peeking out of a dark corner under the ladder to the upstairs. For the bed coverings I hope to find a tiny French Provencal print in a happy blend of colors, perhaps a hint of red or orange in the pattern. There is a fabric shop for quilters just up the road a short distance. I have yet to set foot inside the store but now I have a good excuse to go and see it.

I need a cup of hot coffee! Time to go and make one and give the cats a pet and perhaps crawl back under the covers for medicinal purposes. I will take along a reference book and finish planning out the roofing details.


December 5, 2009

Diamonds really are a girl's best friend

photo copyright Karin Corbin 2009

Diamonds, diamonds and more diamonds. I have lots of them and almost all of them are industrial grade and are not all that expensive.

From a large diamond coated blade in my wet cutting tile saw down to tiny diamond burrs I love them all for what they can do in the workshop. I use them to cut and shape, sand or carve and sometimes even drill stone, ceramics, glass, wood, metal and  foams.

photo copyright Karin Corbin 2009

The items above are diamond coated  files. I love these for sanding small details. Much easier than trying to use an emery board or a grit coated sanding twig and also good value as they last a very long time. Good at shaping metal although I tend to prefer the standard metal, swiss pattern needle files for that particular material use. You can purchase them in different grit sizes and a wide variety of shapes, flat, round, triangular and more.

photo copyright Karin Corbin 2009

The items above are diamond coated cut-off disk that I use in a Dremel Motor. They are not run at high speeds. You saw me cutting a window slot with one. I also cut small glass tubes with them and smooth the edges of cut glass with these. You can use the broad side front or back to sand items as well. They come in a wide variety of grits.


photo copyright Karin Corbin 2009

The items above are diamond coated burrs. I use them in a Dremel Motor and sometimes even a drill press to shape, sand, carve and sometimes drill.

photo copyright Karin Corbin 2009

The photo above shows a tapered diamond coated burr in an overarm router type of setup. I  just used this to create the small bevel on the edge of the wood panels that line the box bed. I tried doing this task with the router but it wanted to splinter the wood so I turned to sanding the bevel instead. I made several passes and ended up with a nice smoothly sanded, beveled edge. There is often more than one way to get a job done!

photo copyright Karin Corbin 2009

The photo above shows using a diamond burr held in a pin vise for a handle. Now they be used as a sanding file for rounded shapes in tiny areas such as moldings on furniture.

Almost all of the items in this posting can be ordered online from Widget Supply, many can be found at your local hardware (iron monger) stores or hobby shops.

December 4, 2009

Cutting a dollhouse window opening

photo copyright Karin Corbin 2009

I was part way through building the shed roofed addition to house the box bed when I decided to add another window in it.

No way did I want to start over again. No way did I want to loose all the hours I spent in making thicknessing, sanding, routing, painting and gluing on the wood paneling that covers the walls.

This situation is very familiar to anyone who has ever modified a dollhouse kit or purchased an old dollhouse and made changes to it after the walls are up.

So here is what I did. I marked out the lines for the window opening. I used one of my very well loved diamond coated cut off disk in a Dremel Motor to cut down through those lines from inside the dollhouse. It is easier to work from outside a dollhouse but I wanted to exactly follow those panel grooves for this window.

photo copyright Karin Corbin 2009

Because the disk is an arc it won't cut all the way through the wood into the corners. In fact I only got a cut through right in the centers of the lines as I am putting in a very small window. But the cut through opening made with the disk was just long enough to feed through a small, razor sharp flush trimming saw.

photo copyright Karin Corbin 2009

Oh how I love these little saws, the blade is thin enough and strong enough to flex a bit without a permanent kink it you don't force it too hard. That allowed me to sneak it inside the walls of this small space and follow the kerf of the cut off disk. Now I have very nice square corners in my window opening. Job done, ready for me to build a window to fit in there.

Hope this method helps you get in a jamb* some day when you want to add another window or door where there was not one before.

Widget Supply is a good place to purchase these diamond coated cut-off disk. Just do a search for diamond disk, be sure you get one with a mandrel so you can mount it in your motor tool. Just like sandpaper they come in different grits.
photo copyright Karin Corbin 2009


My little flush time saw came from Hardwicks Hardware in Seattle, Washington, USA. It is important that this type of saw does not have offset teeth. A typical razor saw does not have offset teeth either. Lack of offset means it will follow along in a groove without cutting into the sides of the groove. You might find something similar in your area and sometimes people call them Bonsai saws as they are used in that hobby for trimming branches flush against the trunks. You can get a keyhole version of this saw too as well as folding handles. The blades are very thin and extremely sharp, they cut quickly with little effort.

*Pun intended, jambs are the wood liners that go against the house framing to trim out a window or door opening.

November 29, 2009

Falling in love again

photo copyright Karin Corbin 2009

When I went into my files today looking for a photo I fell in love all over again with one of my own pieces. It is funny how that can happen. Often when I look at various photos I have taken I think "oh I wish I had done that differently or better" but now and again I feel "oh I got that just right". Well I got almost all of it just right, there is one small detail that bothers me a bit and I want to make that part over again but I can't so I have to accept it the way it is. This is the curse of being an artist.

The photo above is of the bay window on my Acorn Cottage house. The leading on the window is made from the adhesive back lead that is used for weighting putting irons for the sport of golf. It starts wide at the bottom and then tapers to being thinner at the top where it branches out. This window repeats the theme of the gothic arches of the trees which are the framework of the structure.

At first you might think looking into the window that somehow its shape is reflected in there but you are simply looking at and through the little window on the other side of the house by the front door. It too has the same  leading pattern in the shape of a tree. Looking into the dollhouse through this window you can clearly see the slight distortion from the hand poured glass I used.

The carving of the branches in the header over the window continues the line of the branches of the trees from the corners of the house. I like the flow of that and the leaves on the tips of the branches. I have always loved the shapes of leaves.  I don't recall planning that particular design detail to happen, I think it is one of those happy accidents that should have been in the plans. I never noticed that it had happened until just a few moments ago when writing up this description.

The natural boulders of real rock and the ground covering of natural moss and tiny bits of real branches and real fallen leaves all add to the feeling of the forest setting. The small vine on the base is a bit of wooly thyme. Watery thin acrylic paint tints the moss and the vine to keep them green forever. I have not taken the time to learn to make flowers from paper or fimo. The flowers in the pitcher on the sill are real dried flowers and they look perfect to me as they are perfect flowers.

Yes, sometimes our visions do become the reality we intended, this was one of those times and one of those photos where the magic did get captured.

If you come to the N.A.M.E (National Association of Miniature Enthusiast) convention in Seattle Washington USA in the summer of 2010 you can see this dolls house in person. The owner of the cottage will have it on display. It will be fun to see how she has chosen to decorate the interior. I will enjoy the chance to visit it and remember the fun and the struggles I had in creating it. Now and again I get to enjoy visiting some of the special real life houses I have owned and then recreated to my personal visions. The owners always have a great time talking about the magic of those places.

November 27, 2009

Blue Skies and progress

photo copyright Karin Corbin 2009

The sun came out today and it was grand sight to see shades of blue everywhere. The water, sky and even the earth were blue.  Fresh snow on the Olympic mountains provided the contrast of white. The breeze had the white capped waves dancing. Do enlarge the photo by clicking and join me on the beach. Bring hot chocolate with you to warm your hands and your insides, it is very chilly outside.

photo copyright Karin Corbin 2009

Welcome everyone come on into my new dollhouse. Pardon the mess and the duct tape, we are under construction. The carpenters took a holiday, they will soon come back to do some timber framing work. Then the plasterers will come and then the stone mason. The stone mason has yet to carve the stone sink that goes under the window on the left and to finish the fireplace. You have all heard the horror stories of trying to find reliable help in the construction trades.

photo copyright Karin Corbin 2009

Now you can finally see some progress on the dollhouse. Most of the windows are glued into the walls. I still have to cut the parts for a dormer and the roof.

photo copyright Karin Corbin 2009

I have always planned on adding a small shed roof extension. I thought at first it would be a shed roof on the outside to shelter tools and firewood. Then I decided it would hold a box bed for the inside of the house. It is called in France a lits-clos (bed closet). Some of them are free standing pieces of furniture. Mine will have a furniture type front facing the inside of the room. It is tucked in right next to where the fireplace will be, so warm and cozy snuggled in your little box for the night just like a kitten.

This shed roofed addition also helps with the overall look from the exterior and gives the interior more depth and adventure of exploration. An architect would have said it this way "breaking up the primary massing of the building".

It is a quirky cottage, the balance of the elements is informal rather than being symmetrical about a central point. But indeed there is balance and there will also be a lot of rhythm as you will see when it is all finished. One of the things that attracts me to timber framed houses is all of the rhythm of the framing members. It plays a little tune for your eyes and they simply must dance with a happy pace over all  the details of the dollhouse.

A long ways to go yet on this project but I am feeling good about things. Perhaps it won't end up in the trash bin after all.

November 24, 2009

Router bits for dollhouse building

photo copyright Karin Corbin 2009

My Christmas present to myself has arrived and of course I opened it since I knew what it was. A very special set of router bits that are made just for dollhouse miniatures. They fit into a 1/4" shank router. I will use them in my Bosch Colt router on the router table I made for it. You saw that in an earlier posting on my blog.

This router bit set is made by Amana Tools and this set and other high quality miniature carbide router bits can be ordered from toolstoday.com


photo copyright Karin Corbin 2009

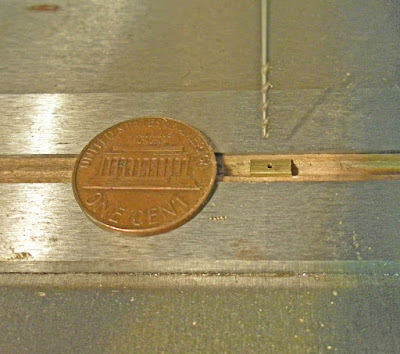
Still learning new tricks for safely working on small parts almost every day. I finally found the brass C channel I wanted for the catches on my window latches so I started making new ones. I decided to cut the pieces to length first. Of course that created the problem of exactly how I was going to hang onto that small chunk of channel so I could drill a hole in it for a nail. As I have already told you brass wants to grab and spin while drilling it. After trying this that and the other I picked up a leftover piece of wood from the windows it was grooved to accept the glass. Oh joy, a perfect snug fit for the channel that put a little bit of grip onto the brass so it would not spin out or shift position when I went to drill into it. Into the vise my wood strip went, supported from underneath to keep it level.

 I put a USA penny in the photo for scale, that drill bit still looks big in the photo but it is only .0292" (.741mm). The smallest size drill bits are numbered, this one is a #69, they are called wire drills.

November 20, 2009

Window Latches

photo copyright Karin Corbin 2009

The working window latches are just about done. I can see that I need to move the catches on the upper and lower edges over to the right a little more. Digital cameras are so fantastic to use for an instant critique. It really gives you a fresh perspective and virtual set of  eyes that have not been staring at a miniature part for far too long.

The handle in the center of the latch is a fragment of one of the Vintag brass findings I got at the Fusion Bead store in Seattle the other day. The brass rod has a darkening patina applied to it. No bling allowed on this dollhouse but there is a richness of texture and detail that tells its own story in this structure.

In case you are wondering about scale the brass rod I used is 1/32" in diameter.

While they are not a replica copy of any particular window latch they are of the early style that was found on old houses. They will do nicely.
.

November 16, 2009

Never enough Vise


You can't make tiny metal parts without good holding devices. The photo above shows a little guide block I am building as part of my window latching system. The square part is a bead I found into which I have drilled another hole. In that hole I have soldered a piece of 1/32" brass rod that has been trimmed to length and will be filed into a point. The pointed rod pin will go into the window frame and help keep the guide block secured in position. A dab of superglue will secure the guide block to the window frame surface. The pin primarily keeps the block from shifting side to side when under pressure and also adds extra surface for the glue to grab onto.

I have to use a needle file to point the pin and also to remove oxidation from the soldering process. Hard to hold anything that tiny with fingers so I have it held in a pair of flat nose, smooth jaw parallel pliers. You can find them on the internet using that keyword description. When the pliers grip the jaws stay parallel along their length. That creates a good grip that is also a gentle grip and it won't scratch my piece. The pliers I am using allow for a long part to go right on through them which is another useful feature. Update: You can now purchase these pliers online direct from my favorite hardware store Hardwick's in Seattle. Click here to order them.
photo copyright Karin Corbin 2009


Another essential tool for making my window locks is a high quality bench vise. The vise on the right is called a pattern makers vise, the vise on the left is an Eron block vise. The long bar in the pattern maker's vise is a parallel which raises the object I am holding up to the height I need it to be but keeps the object squared to the surface and supported from underneath. I used that when drilling the hole in the bead to accept the pin.
photo copyright Karin Corbin 2009
These small vise are created to a high quality standard. The jaws are smooth on the inside. When you tighten them the jaws stay parallel to each other, that is essential for micro machining work. Cheap vises lift one of the jaws as you close them and you only get pressure at a small point when that happens. It will also gouge your work due to that shift out of parallel.

Another good feature is when working with them on the bench I can flip them around from one side to the other and still have a flat surface to rest on the bench. That lets me work on small parts from several different sides without moving the part in the vise.

Every year I add a few new quality items like good vises to my tool collection to help me make small metal parts. I have a Panavise but it just does not compare in ability to the pattern maker's vise for most tasks.

November 13, 2009

Auxilliary Fence

photo copyright Karin Corbin 2009


I did not find any C shaped brass channel of the size I needed on my shopping trip to the stores. However I did find some square tubing that could be made into C channel. 

Brass is somewhat dangerous to cut and drill. It is soft and the bits of material being cut will bind up in the drill  flutes and saw and even clog up your files. Because it will grab and bind on the tools it can spin out of your control and damage the part and you.

Working with small pieces of any type of material requires being able to control the material so it does not move in directions you don't desire. For this particular operation I created a purpose made auxiliary fence. Nothing special about making it just a piece of scrap plywood with a notch cut into it that I sized to fit snuggly around the brass tube I wanted to trim.

I clamped that purpose made fence to my normal table saw fence and from the back I pushed the brass into the saw blade. When I had a long enough cut (less than an inch) I pulled back on the brass tube to pull the piece back out of the saw blade instead of trying to push it on through. I don't need long lengths for my parts. If I had to cut long lengths I would need to make a second auxilary fence that was clamped behind, but clear of the saw blade. A long skinny length of material tends to whip around and lash back into the saw blade and of course knocking into the teeth on the saw blade would ruin the part.

In the photo below you can see the backside of the auxiliary fence and the cut I made into the brass tubing. It is a very simple cutting task but a potentially dangerous one for injury to hands and fingers.
photo copyright Karin Corbin 2009


I will do any filing and drilling work to this piece before I separate my new C channel from the long length of brass tubing. It is good to have a nice built in handle. I will also use that advantage to clamp the piece to my drill press table so it does not spin out of control. This channel will hopefully become part of a catch for my window locking system. My reference book "The French Farmhouse" calls the type of latch an "espagnolette". I will be making a very basic, no frills version, of that locking bar system.

Creating holding fixtures so you can work with small pieces of materials is a skill dollhouse builders must develop. If you needed to modify a small piece of commercial, strip, basswood and safely run it through a saw or router you can use the same type of technique of making an auxiliary fence that I used to resize my brass tubing.

November 6, 2009

Squaring Up Assembly Jig

photo copyright Karin Corbin 2009

Yet, once more you see a jig made out of odds and ends of leftover small pieces of materials from my workshop and you will keep on seeing them. It is the green thing to do, recycling at its best and it saves money.

I needed to square up and assemble the pieces of windows. The two white melamine strips are glued and tacked to a piece of plywood. They did not need to be melamine, its just what was handy in my scrap box today.  They are nicely square at 90 degrees, that is what is important, that the edges be 90 degrees so if I had to clamp upright pieces against them my parts would sit square to the base. I used a large, professional quality, drafting triangle to help align that corner.  That drafting triangle helps me setup all kinds of fixture and fences for dollhouse work. Glue and tack one strip to the plywood, then put glue on the second and using the drafting triangle as a guide clamp it and let it dry. You can add brads after it dries if you think they are needed.  One caution sometimes glue lets pieces that are clamped creep out of position so keep an eye on it and while it is still wet gently tap it back where it belongs. A fast way to get rid of glue creep is to rub the two glued surfaces together, the friction heats the glue so that it kicks off more quickly. A thin layer of glue evenly spread is better than a thick layer because it won't tend to creep. That is important to remember when you assemble wood pieces.

To clamp the pieces into the corner I use more cut off pieces of wood to the push the window components into that squared up corner.  Those pieces also need to be nice and square. One of the pieces of wood I grabbed is my push stick for the small table saw. It fit in there and why cut something when it was right by my hand at the right time? It will go right back to being a push stick shortly. Did it surprise you to see me using those big clamps to do a delicate glue-up task? They don't have to touch the miniatures, they are simply holding the pieces that are applying the gentle pressure on my window parts.

This is jig building at its most basic for a very basic and frequently required task.  Part of the reason for creating this blog is to show some of the behind the scenes dollhouse building work that is not in books or magazines. If you want to start building and don't have a background in making things it helps to watch over someones shoulder now and again. Just remember there are hundreds of ways of doing the same thing. I don't use the same way all the time, it varies depending on my mood, materials on hand and if I am in the mood to play engineer or mad scientist and try something new.

Proxxon Miter Saw Fence


photo copyright Karin Corbin 2009

The Proxxon KGS80 Miter Saw is a very nice size for many task when scratch building a dollhouse. Not for the tiny strip wood pieces but great for things like window and door frames, flooring strips and such. However as it is out of the box it is going to launch any small pieces you cut all the way across the room. It is a powerful saw for its size. Good luck finding anything small in the back room of my workshop and of course the parts can be damaged by the journey and landing.

To make repetitive cuts of strips of wood an easier task I built a fence out of hardwood. Now my cut off pieces stay right there on the fence and I don't have to go hunting for them. My custom fence is sized to fit into the existing clamp on the saw. I did not want to modify the miter saw as it is very good for cutting pieces of non ferrous metals in it's standard configuration. The fence is a piece of 3/4" thick poplar wood that is cut to fit into the clamp opening. It is a little tricky to fit the fence in under the motor and on into the clamp, you will have to mess around with the design making adjustments as you go. Do worry a great deal about getting the fence on the back nice and square to the saw blade so it makes perfect 90 degree cut.

I had not used the saw for a while as I knocked off part of the back fence during the move last year. But since I had been ripping strips of hardwood and had plenty of extra it was a quick repair with that rubbery superglue. Now I am back in action again, whew, that feels good. I really like this saw.

If you are going to make a setup like this for your saw keep in mind that the rear wood fence needs to be short enough for the motor of the saw to come all the way down. Look at the photo, you will see the approximate height you need.

photo copyright Karin Corbin 2009

I made my fence base so it extended out further to the left so I can clamp on stop blocks. A long stop block will reach in quite a ways towards the center.


It is very important for your safety that you need to know the correct way to use miter saws with stops. You must secure the wood you are cutting some place between the saw blade and the stop block. If you don't the wood will get into a pinching situation and the part can be damaged and so can you.  Sometimes there is room for your fingers to do the clamping but don't take foolish risks. The eraser end of a pencil gets where fingers won't but sometimes even that is too big.  You can make other kinds of  custom hold down pieces as needed. When it is impossible to get in there with any kind of a clamp make a removable stop. Secure the work on the other side of the blade instead where you can get a grip on it.

You can find out more information on the Proxxon KGS80 by clicking "HERE"

November 3, 2009

Miniature Custom Carved Sabots

photo copyright Karin Corbin 2009

I commissioned Linda Master to carve a pair of sabots for my coastal cottage project. Fishermen wore these to protect their feet from the wet long before there were rubber boots. Of course if a wooden shoe came off it would float instead of sink. They are much also warmer than wet leather.

photo copyright Karin Corbin 2009


They arrived just the other day. I love the custom carved shoe box she made for safe shipping.
photo copyright Karin Corbin 2009


You can see their actual size as they sit on the inch ruler.
photo copyright Karin Corbin 2009


This is amazing carving in miniature. The width of the wood on the shoe opening as it turns around the heel is so consistent I can't imagine achieving it myself. The leather straps are perfect as well. The shoes look just slightly worn and scuffed, exactly what I was hoping for.

Sabots are fairly simple compared to many items Linda makes in miniature. You really have to check out her web site. You will fall in love and want to spend all your dollars there. Click " HERE to go to the website for Miracle Chicken Urns. There is an interesting story to go with the choice of name for Linda Master's business.

Linda does take custom orders so your miniature dreams can come true just like mine did. Have you ever wanted your real pet dog or cat to live in miniature size in your dollhouse?


I learned an interesting tidbit about the word sabot, it is the root word for sabotage which came from  throwing these shoes into the working parts of machinery during the war years to mess up production.

Installing the hinge


photo copyright Karin Corbin 2009

My hinges started out all bright and shiny, these were the gold plated over brass hinges from Houseworks. First thing I did was take a butane torch and burn off the gold plating. Then I took a needle file and cleaned the burnt oxide off the back of the hinge so it is bare brass again. That filing step also roughed up the surface just a little, giving it tooth. Now the glue will stick to it nicely. 


While I was at it I took some smooth jawed, duck billed, pliers and straightened out and aligned those hinge knuckles. Shame on you Houseworks, all your hinges have wonky knuckles. I also have to hammer the hinge leaves flat as they often have a cup to them.

Why mess up lovely gold plated hinges? Because the shiny gold would be completely out of character with the dollhouse I am building. My hinges have been out in the briny salt weather where plating or lacquer coating has absolutely no chance of surviving. I could have done a rust finish or a green patina finish but I am happy with the dull blackened look.


photo courtesy of gorilla glue

For the last several months I have been using a new kind of superglue. It is formulated with a little bit of rubber to make it shock resistant. I love this stuff better than any superglue I have ever tried before. It works just great for miniature hinge jobs and there is not a strong chemical smell to it. I got a gel version as hinges and recesses are never perfectly flat, the gel fills up those little gaps nicely. 

Most super glue companies are selling this kind of rubberized formula, I am currently using the Gorilla Glue brand because that is what I found at the store.

When you go to glue your hinge be sure both halves are supported so the hinge is balanced and you don't have to fight it flopping around and pulling loose before the glue is cured. I have clamped a scrap piece against my door for support of the unglued half, you can see this in a photo down below where there is natural wood next to the blue door.

Spread a little glue in the hinge recess you have cut and push your hinge down into it. You don't want any excess glue squeezing out and over the hinge surface, use enough to make a full coverage but not a huge amount. Hold it down for a minute or so to make sure it is firmly set.


After the glue is set up I used a needle sharp, very fine tipped awl to poke in starting holes for the nails that came with the hinge. The awl is a better choice than trying to drill a hole, you can see how small the awl tip is in the photo below, it is super sharp. I grap the nails with flat nose tweezers that have small grooves all along the inside edge. The head of the nail slips between the grooves and they grip the nail so you can push to start it. First though I put a little dab of glue on the tip of the nail so it won't come back out of the hole. You might need to push the nail on down further with a small flat, metal object such as the tip of a flat blade screwdriver until the nail is fully set against the hinge. 
photo copyright Karin Corbin 2009


Next I take a needle file and flatten the nail heads out quite a bit. That makes the heads smaller, they look more realistic and it also removes any gold plating. I used a chemical patina solution to darken the shiny brass nail heads and also the hinge. Now I have grungy old hinges for my grungy old door.

My favorite dollhouse hinges come from Micromark, they are solid brass and are not gold plated. The quality of the hinge joints is superior to those from Houseworks. However I did not have enough of them for this project and I did have lots of the Houseworks product. 

Hinge recess jig


I designed and built a simple jig today to create those pesky little recesses, otherwise known as mortises, that the door and window hinges drop down into. They are so easy to mess up trying to guide the tools by hand. Too wide, too deep, too long, crooked, I have made all those errors before and I was tired of fighting the task.


My jig is made from  leftover pieces of material that were donated from Don's workshop. He has a real treasure trove of metal odds and ends and fasteners too. I used 90 degree aluminum angle. The larger of the two pieces was 1.5" x 1.5" by .125" thick. It is long enough and wide enough to allow me to clamp stop blocks to it and also the clamp the pieces I am going to attach hinges to.


The hinges I will be using are just under 3/8" in length, they are the standard dollhouse door hinges you purchase from stores. To create a guide notch in the angle I used a 3/8" end mill cutter, I could have used a 3/8 straight cutting router bit instead. The bit created a little too long of an opening so I glued in a brass shim to shorten the length. (Note that I don't always get these things right on the first try) Or you could use a narrower bit and take two passes to make the opening.

My chisel is guided down against the three edges of the opening. Hand pressure is all that is needed to make these shallow cuts.

The second piece of 90 degree angle was epoxy glued to the first piece. It is used to control how deep the bottom of the recess will be cut and to guide the chisel in so it is level for a perfect flat bottom for the hinge to rest on.

My chisel rest on the smaller angle as I push in to remove the waste piece. All  you need is light hand pressure to pare out the waste. A very sharp chisel is required for the task, my chisel is .25" wide.

I hope this post inspires you to make jigs to improve the quality of your work and also to make it much less stressful. I made mine for both reasons as I hate to mess up windows and doors I have spent a lot of time making. I was dreading the hinging task so I motivated myself to do something to make it easy for all the miniature houses I want to build in the future.

The secret to designing jigs is to think about the motions you need to make for the task and how you can control those motions for accuracy and repetition in the simplest way possible.

 How will you guide the tools you use to make cuts and how will you hold the piece you are trying to cut in the correct position?

You can build a hinge recessing jig out of hardwoods, just be careful not to allow the chisel to cut into the guiding surfaces. It will last a good long time. Or you can glue thin brass to those surfaces to give them an even longer lifetime of use. If you use a jig often and it gets a lot of wear then metal is a good choice.

October 29, 2009

Window progress

photo copyright Karin Corbin 2009

The windows are coming along. I wish I could say they are almost finished but there is still much to do. I will be making the frames that hold the windows and go into the house openings next. Then comes the hinging. After that there is more wood trim  goes onto the windows. There is a vertical piece that covers the join on the casement windows. There is a drip molding to fabricate that glues onto the lower edge of the windows and door. That drip detail keeps rain from getting into a house. After that is hardware, knobs, locks and such. Shutters will be made later and installed after most of the exterior work on the dollhouse is finished.

You will see on some of the windows that are not painted there are bits of blue showing. I paint inside all of the grooves I made to hold the glass. The blue color in there helps disguise the thickness of the glass. In addition the back side of the muntin strips that glue to the glass are also painted. You would be able to see the bare wood if they were not painted. Painting is done with a watered down, very thin coat of flat, exterior house paint. I run the corner edge of a piece of glass through the groove to act as a scraper to remove any excess paint. The grooves are painted before I glue the window frames together.

I have decided to cut new walls for the dollhouse out of the thicker foam cored EasyBoard. It is about 7/16 thick although they call it 1/2". I want window sills and 1/4" is just not going to give me that look. Having the windows and doors all framed up makes it easy to create the openings to the exact size. Two steps forward one step back, oh well it will get done one of these days.


I am looking forward to getting this part of the job done so I can get those walls up and start the timber and stucco work. Working with tweezers to put in tiny bits of muntins and then detailing them with a scalpel is not my favorite task. But I am not done with it yet, looking at the sets of windows next to  the door I realize I need to take the muntins off the door and change it from a 6 lite grid to a 9 lite so the proportions all work together.

My original thought was to do some leaded glass windows but for some reason I decided not to. I do have two types of windows with different muntin patterns that might have been salvaged and installed at a different time. On a centuries old cottage replacement windows would be the normal look.

Even on more modern houses I have owned and renovated I have seen three sets of window changes on a cottage  that was only 80 years old. There were the original wood framed, plus some single paned aluminum and also some double paned vinyl windows. All the exterior doors were different types too. Another house I owned was built with salvaged windows the original builder thought were charming.