December 13, 2009
Quick start carving
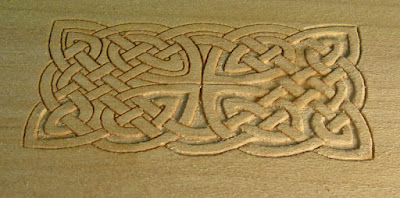
I have started work on the front panel of the box bed cradle. Continuing the theme of sailors and ropes I selected a Celtic knot design from a Dover publisher's pattern book that came with the images on a CD. I resized the image to fit my cradle.
The photo above shows the carving work as it is progressing. Some areas just have the pattern incised, others have the background removed and a few have the "ropes" just about finished up.
I am very fortunate to have access to a friends laser cutter and I used it to transfer the image I chose to my piece of wood. Now most people stop there and use the laser carving as the finished carving. While pyrography, a word meaning writing with fire, has been around since the days of the cave man that was not the look I wanted for the cradle. I wanted a hand carved panel with deeper detailing.
I could have used a piece of carbon paper to transfer the design to wood and then used a hot knife to cut in along the edges of the pattern. I have used that method on carvings before and it works nicely to help prevent broken carving details.
So here are the steps, transfer the detail and cut along the edges straight down into the wood with a knife or laser. Next remove the deeper background areas with a small knife and chisel. Jeweler's gravers are terrific micro chisels that fit into small spaces. Remember those diamond burrs I showed you a couple of postings ago? I am using those as hand held sanding sticks and also using needle files as the abrasives to help round over the roping details and also to smooth the background.
I hope you all find time for a bit of creative fun today.
